
City National Business Suite
®
Mobile Application
User Guide
September 2023
The information contained in this document is confidential and only for the intended recipient. It
may not be used, published or redistributed without the prior written consent of City National
Bank.
C
ity National Bank Member FDIC. City National Bank is a subsidiary of Royal Bank of Canada.
© 2023 City National Bank. All Rights Reserved.

September 2023 Business Suite Mobile App
2
Contents
Application or Web Experience ...................................................................................................................... 3
Security .......................................................................................................................................................... 3
Getting Started ............................................................................................................................................... 4
Important Notes:
........................................................................................................................................................................ 4
For Users with Personal Banking* and Business Suite:
............................................................................................ 4
Dashboard ...................................................................................................................................................... 6
Menu .............................................................................................................................................................. 8
Accounts…………………………………………………………………………………………………………….…..8
Balances and Activities………………………………………………………………………………………………..8
USD Accounts……………………………………………………………………………………………………………………………….……,8
Foreign Currency Deposit Accounts ................................................................................................................................................ 10
Deposit Accounts ........................................................................................................................................................................ 10
Time Deposit Accounts ............................................................................................................................................................... 11
Investment Sweep Accounts ........................................................................................................................................................... 11
Loan Accounts
............................................................................................................................................................................... 12
Stop Pay Requests.......................................................................................................................................................................... 13
Transfers ......................................................................................................................................................................... 14
Quick Transfers ............................................................................................................................................................................... 14
Approve Transfers ........................................................................................................................................................................... 15
Payments ........................................................................................................................................................................ 17
Bill Pay – Single Payment ............................................................................................................................................................... 17
Bill Pay – Approve Payments .......................................................................................................................................................... 18
Bill Pay – Activity (Scheduled Payments) and History ..................................................................................................................... 19
Canceling a Payment ...................................................................................................................................................................... 20
History ............................................................................................................................................................................. 20
Payments Requiring Approval ........................................................................................................................................ 20
Recurring Exceptions (Payments) .................................................................................................................................. 22
E-Deposit ........................................................................................................................................................................ 23
Create Deposit
........................................................................................................................................................................... 23
Add items
................................................................................................................................................................................... 24
Confirmation and Transmission
................................................................................................................................................ 25
Deposits
..................................................................................................................................................................................... 27
Fraud Control .................................................................................................................................................................. 28
Exceptions ....................................................................................................................................................................................... 28
Decision History .............................................................................................................................................................................. 29
Check Issue/Voids .......................................................................................................................................................... 30
Administration ................................................................................................................................................................. 32
About CNB ...................................................................................................................................................................... 34

September 2023 Business Suite Mobile App
3
Application or Web Experience
City National Bank provides City National Business Suite® Mobile in two ways:
the City National Bank App
®
(“Mobile App”) and the Mobile Web Experience.
Most users of Business Suite will do so through the Mobile App, which is
described in this User Guide.
If you prefer using the Mobile Web Experience instead of the Mobile App,
refer to the Mobile Web Experience User Guide.
Security
With City National Business Suite Mobile through the City National Bank App, you will enjoy the
same safety and security that you currently experience with web-based Business Suite on your
office computer. This includes:
•
Multi-user entitlement controls.
•
All users must first be entitled for Business Suite by your company’s System
A
dministrator.
•
Users access the Mobile App with the same user credentials as those used online for
the web-based system.
Secure Logon and Session Management features include:
•
Credentials are validated using our secure multi-factor authentication process.
•
No sensitive information is stored on the mobile device.
•
Automatic session timeout after 10 minutes of inactivity.
•
Users are given a unique session upon successful logging and can only be logged in
from one device/browser at a time.
•
Session is encrypted using device-specific information.
Enabling Users for Business Suite Mobile
Business Suite Mobile is automatically available to all Business Suite clients
and the designated System Administrators who download the Mobile App. In
other words, all users who have access to Business Suite will have access to
Business Suite Mobile.

September 2023 Business Suite Mobile App
4
Getting Started
Important Notes:
•
INITIAL USER SET UP: Before downloading the Mobile App and logging into the mobile
service, you must first be setup on Business Suite by your System Administrator and then
you must establish your login credentials and security information on your office computer,
before you activate the Mobile App.
•
EXPIRED PASSWORD: If your password has expired, you must first reset the password
on your office computer before attempting to use the Mobile App. It is not possible t
o
re
set your password on your mobile device.
•
USER ACCESS: The features you are entitled to access through the Mobile App are
determined by your online user entitlements and whether the feature is also available on
the mobile service. For example, if bill pay service is not available to you on your desktop
computer, it will not be available to you on the mobile service.
•
MOBILE PHONE OR OTHER DEVICE AND PAGE ORIENTATION: The site is designed
for viewing on a mobile phone using either portrait or landscape orientation.
•
HISTORICAL DATA: Available transaction history conforms to what is available on the
desktop.
•
SUPPORTED BROWSER/OPERATING SYSTEMS:
o
Safari 10+; iOS 10+
o
Chrome 49+; Android 7 Nougat
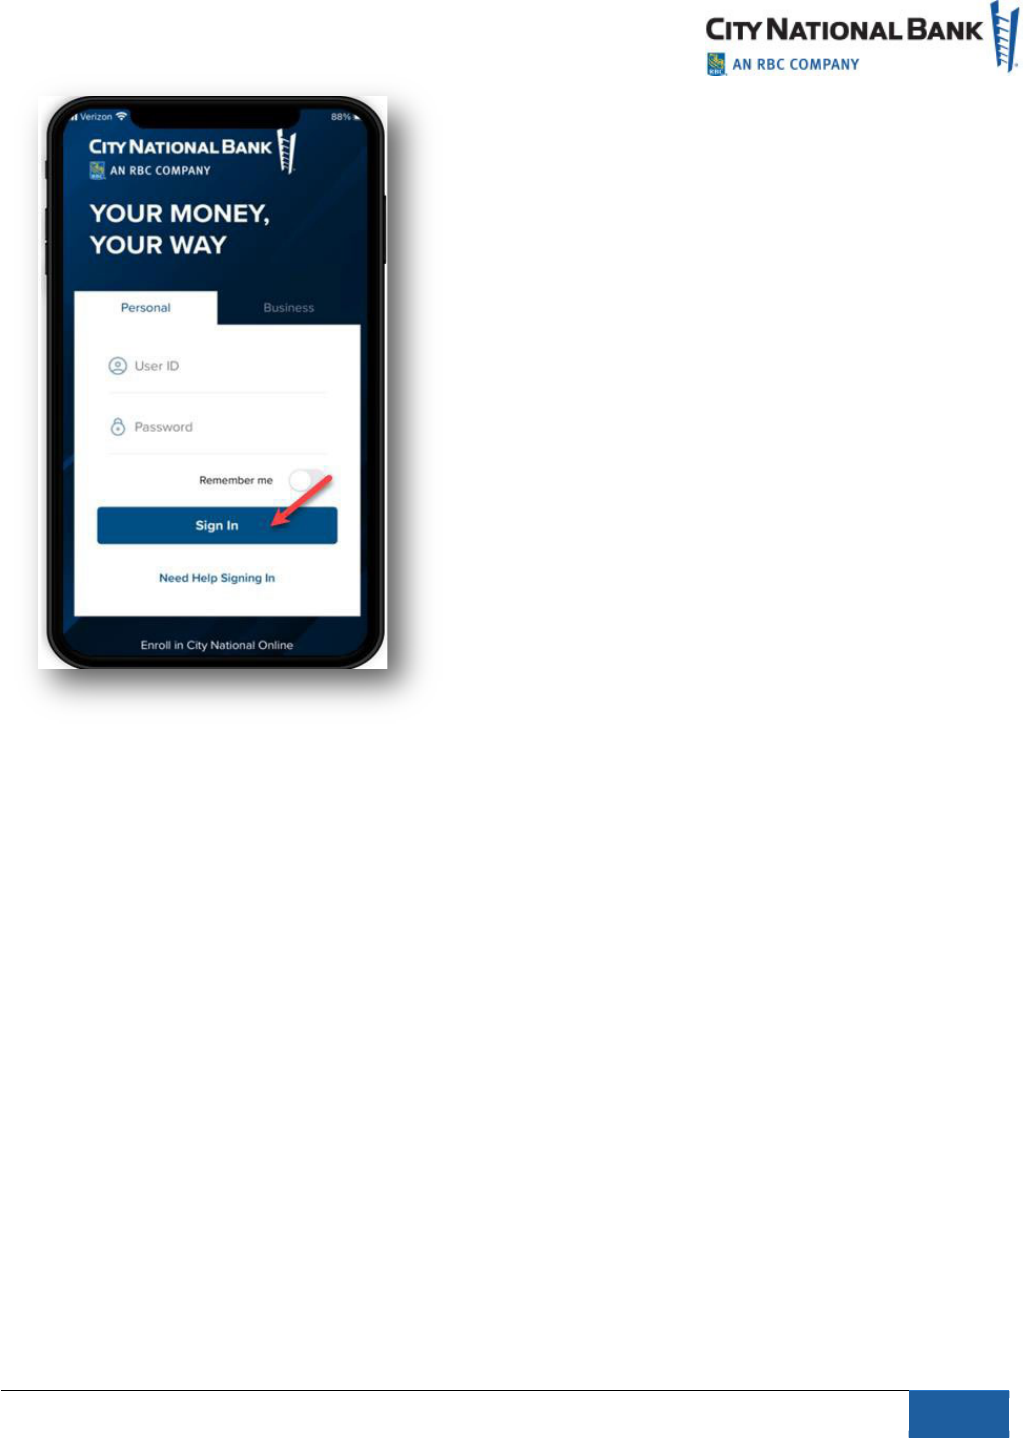
For Users with Personal Banking* and Business Suite:
1.
Download the Mobile App from your respective app store.
2.
After installing the Mobile App on your phone, select Get Started.
3.
Under the Personal tab, enter your Personal User ID and password,
when prompted.
*
Personal users have the ability to enroll in online banking via the Mobile App, by
selecting “Enroll in City National Online.” As a business user, please be sure you are
set up for City National Online and Business Suite before using mobile banking. Y
ou
w
ill be asked to read and consent to the terms and conditions for using the system
,
both on your computer and on the Mobile App, while setting up Business Suite on
y
our computer the first time.
4
September 2023 Business Suite Mobile App
5
The Mobile App provides personal users with the ability to access business
accounts in Business Suite, without having to re-enter a business ID each
time. You can set this up by following the instructions below.
1.
Go to
Settings
on the main navigation.
2.
Next, select
Business Suite Settings
.
3.
Follow the instructions to add your active business profile by
entering your Business Suite User ID and password information and
going through the validation process.
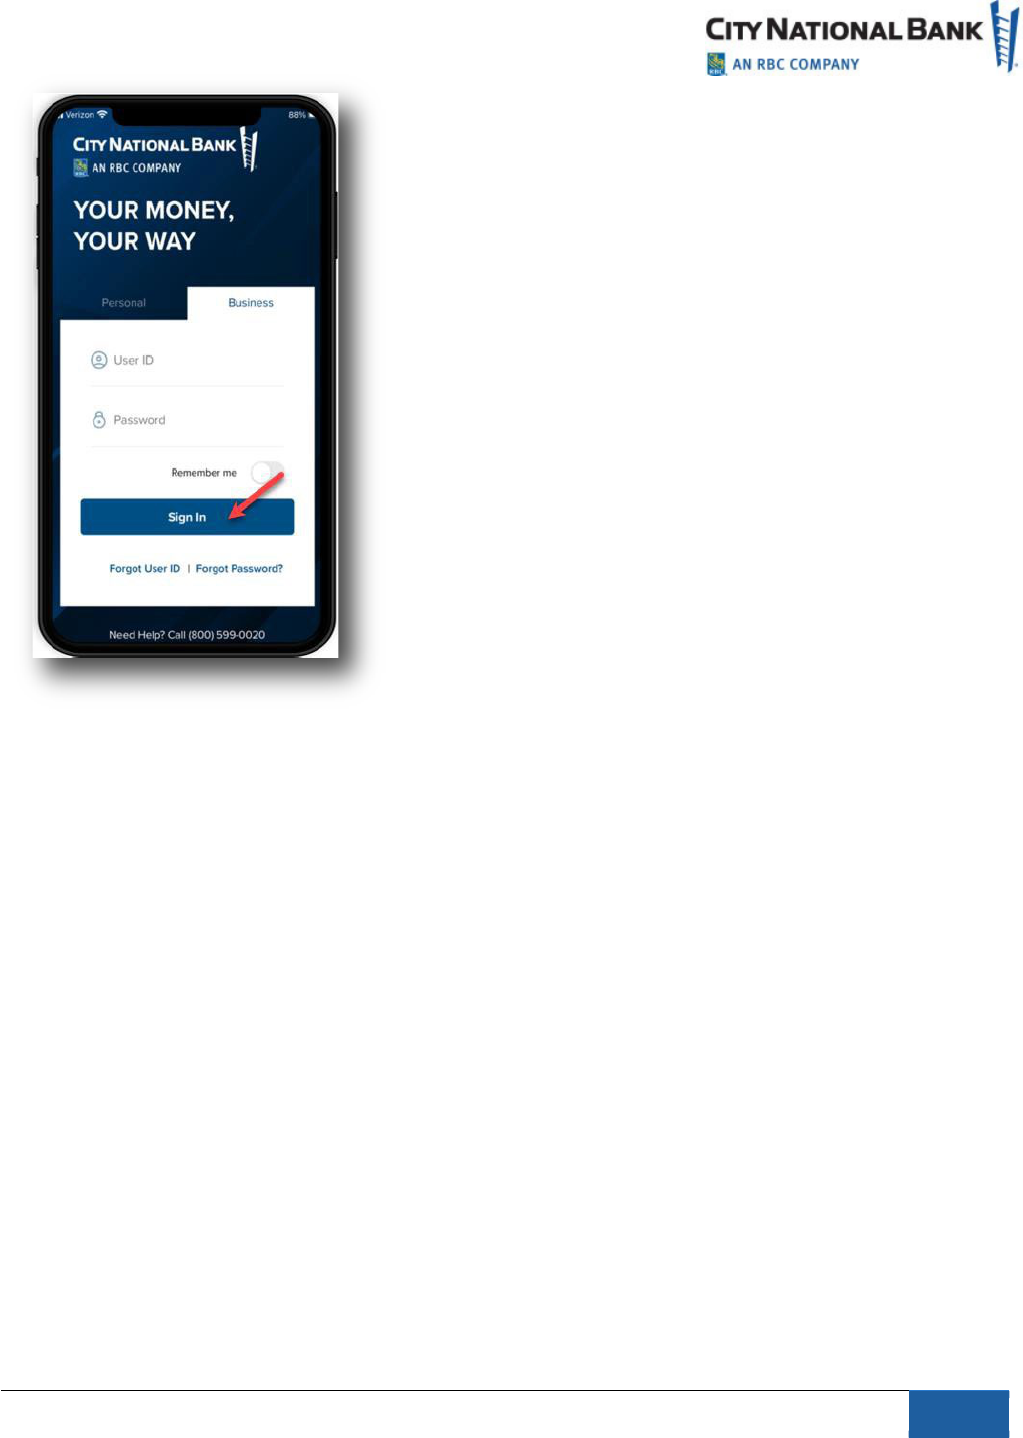
For users with Business Suite only:
1.
Download the Mobile App from your respective app store.
2.
After installing the Mobile App on your phone, select Get Started.
3.
Select the Business tab to access Business Banking.
4.
Enter your Business Suite User ID and password, when prompted.
September 2023 Business Suite Mobile App
6
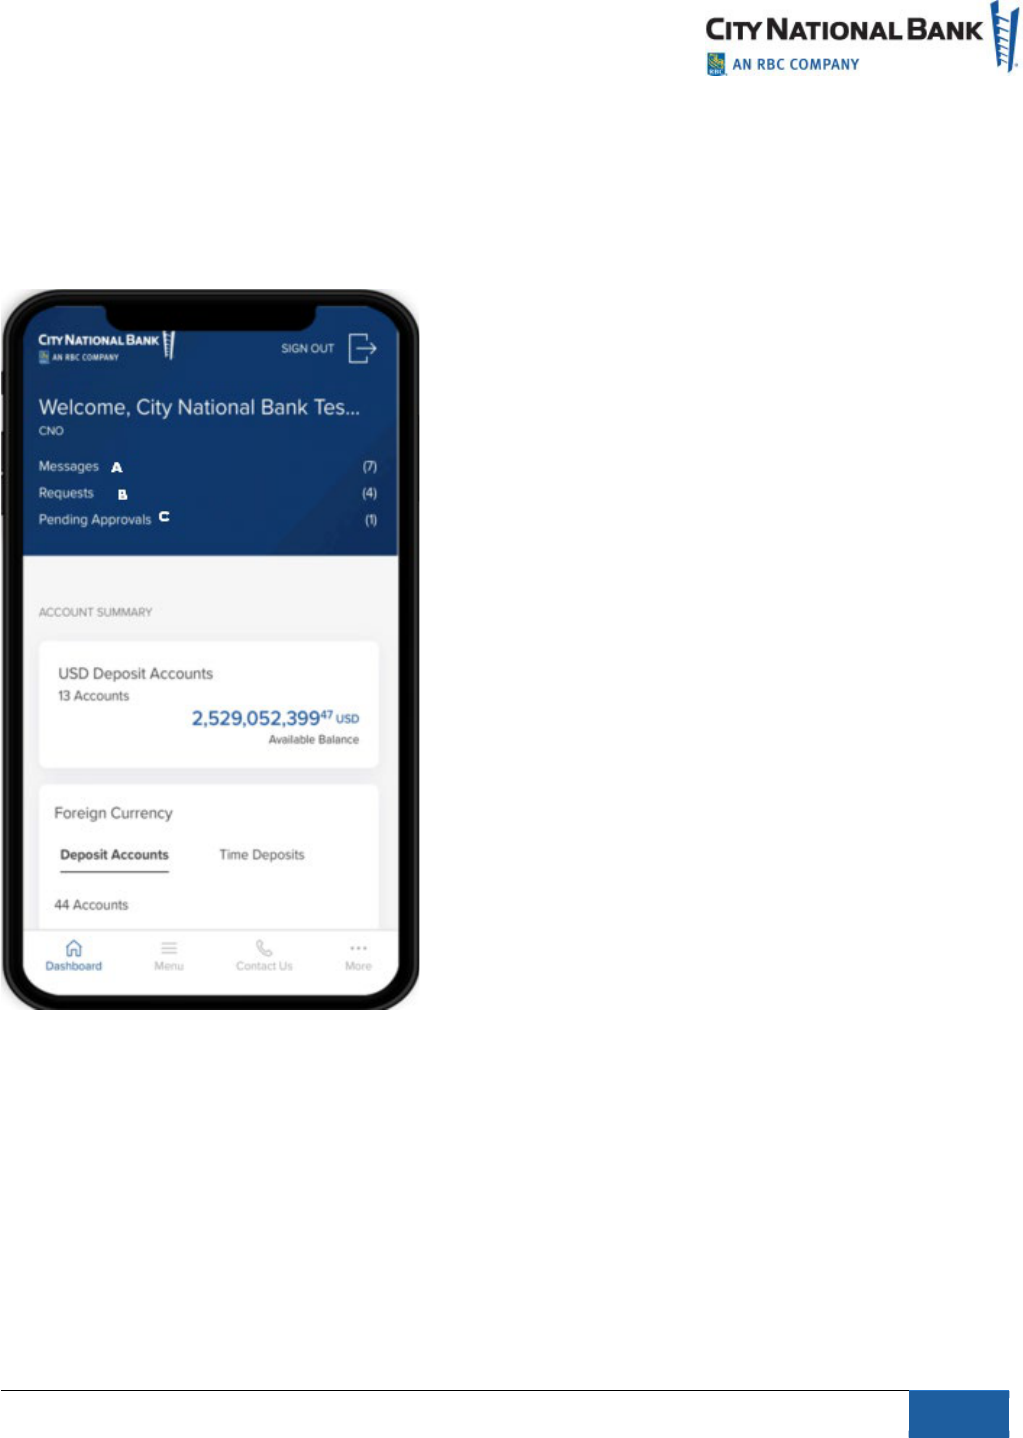
Dashboard
After signing in, the Dashboard page will display.
•
The Dashboard provides a summary of your accounts and corresponding
b
alances.
•
Get more details for each account by selecting the right arrow next to the account
type (e.g., US Dollar or Foreign Currency Deposits, Investment Sweeps or Loan).
Note:
When successfully signing into Business Suite on your computer for the first time, you
will have accepted the terms and conditions for using the Mobile App.
From the Dashboard, as shown below, you may choose to do the following:
•
See bank messages by going to the Message Center or by selecting
Messages
(A).
•
View the total number of user service-related
Requests
(B) you have submitted. (If link is
displayed)
•
Approve a request to unlock a user by selecting
Pending Approvals
(C). (If link is
displayed)
6
September 2023 Business Suite Mobile App
7
If links are displayed within Requests and Pending Approvals, you can filter and sort by:
•
User
•
Approver
•
Request Type
Note:
Search words are case-sensitive.
September 2023 Business Suite Mobile App
8
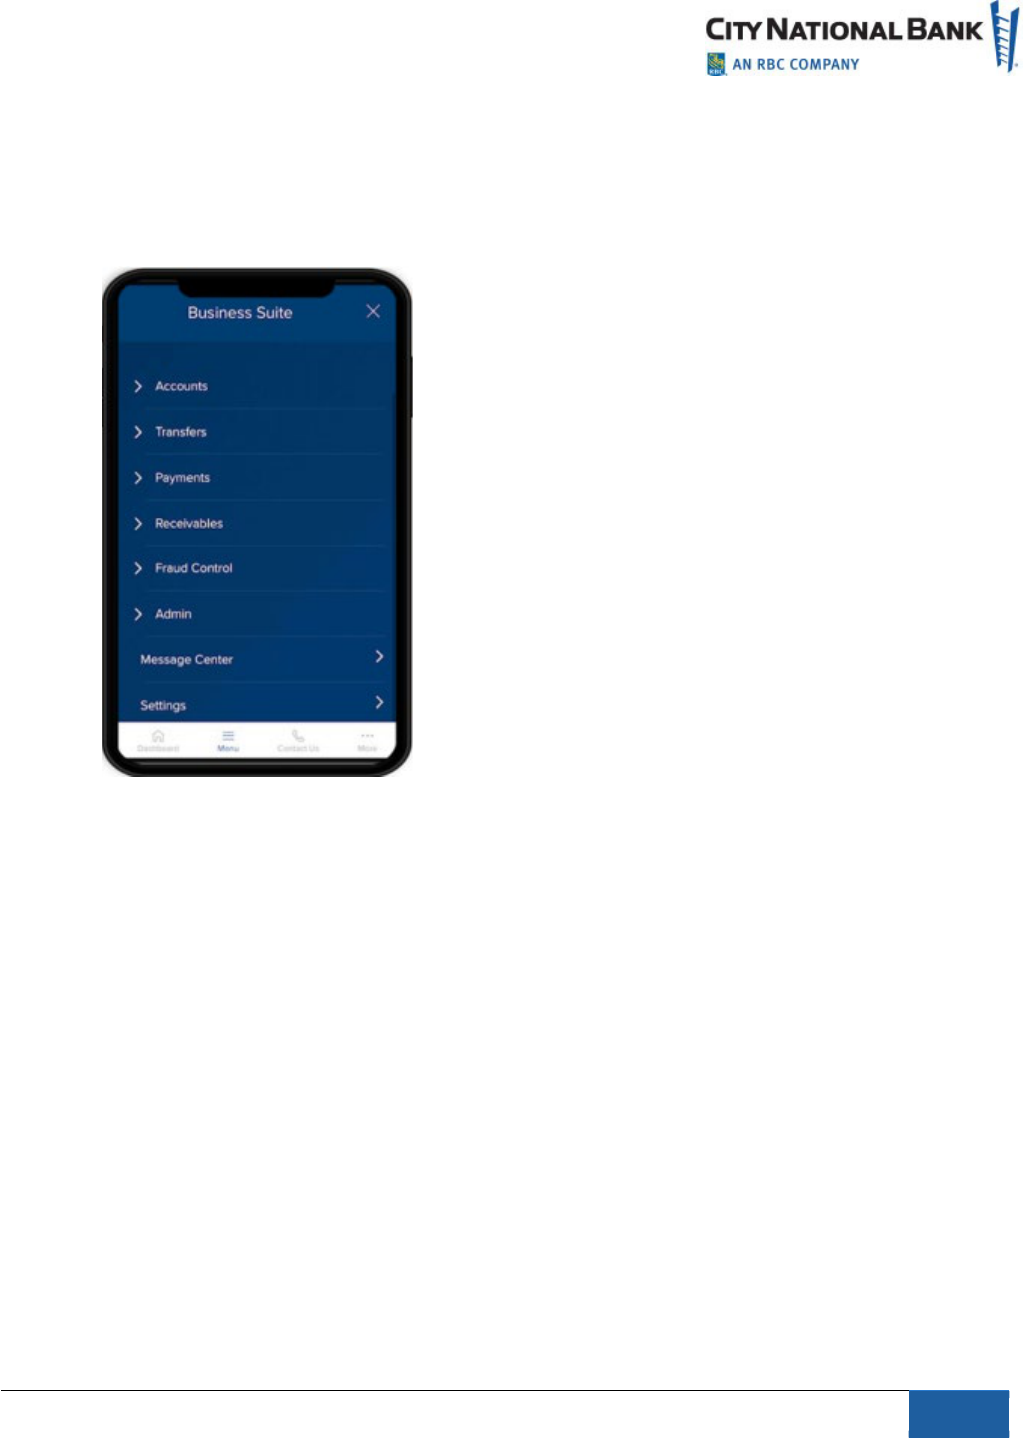
Menu
From the Menu, you will navigate to the different modules/types of service by selecting the
appropriate menu item.
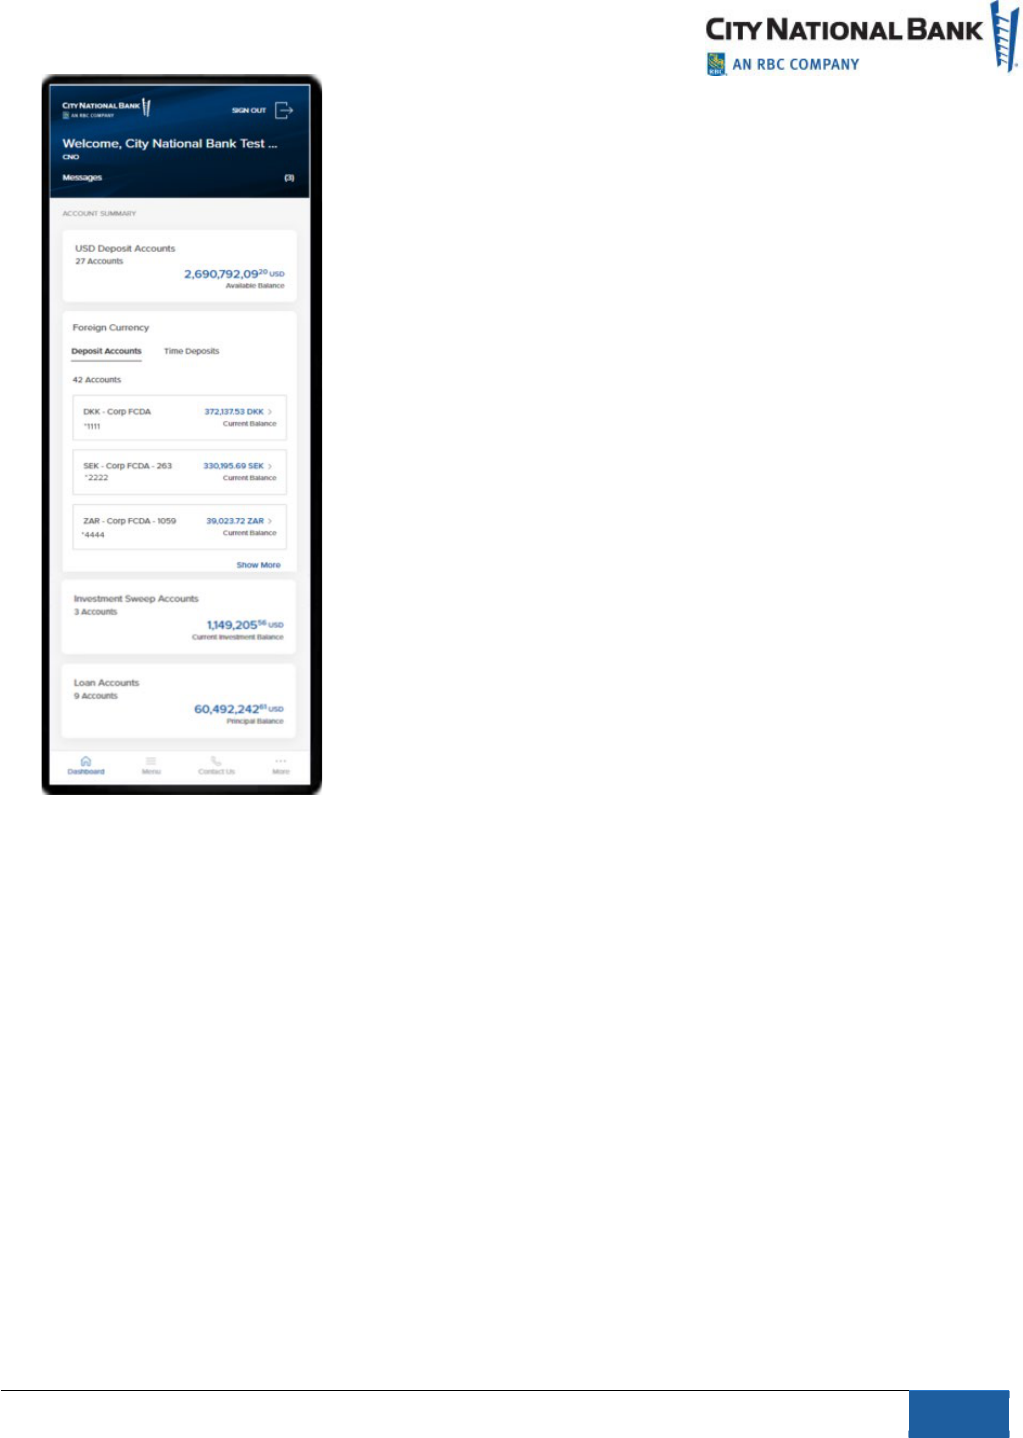
Accounts
Account Summary
Account Summary provides an overview of the different types of accounts you have (e.g., US
Dollar and Foreign Currency Deposit Accounts, Investment Sweeps and Loan Accounts) and the
accounts within each type. It also shows balance information and detailed account activities.
Balances and Activities
USD Deposit Accounts
1. From the Dashboard, select USD Deposit Accounts.
2. All your deposit accounts will be displayed.
3. Each account will include the following information:
•
Account name
•
Last 4 digits of the account number
8
8
September 2023 Business Suite Mobile App
9
•
Available Balance
•
Ledger
•
Related Available
•
Net Activity Today
•
Total Accessible
3.
You can search by Account Name or Number and f
ilter by:
•
Account Name
•
Account Number
•
Available
•
Ledger
•
Total Accessible
•
Net Activity Today
•
Related Available
Sort by: (ascending or descending order)
•
Account Name
•
Account Number
•
Available
4.
To view all transactions for an account, select View Transactions.
Yo
u can search Account Transactions by Description or by Serial Number.
You can also
filter Transactions by the following categories:
•
Check Paid

September 2023 Business Suite Mobile App
10
•
Debits
•
Credits
•
Select a date range: Today, Prior Day, Last 7 Days, Last 30 Days, Custom Range, Select
a Status, Pending Cleared, Search by Amount
Sort by: (ascending or descending order)
•
Date
•
Description
•
Serial #
•
Amount
5.
Select a transaction to view transaction details. Transaction Details include the following
information:
•
Date
•
Description
•
Image (if available for the item)
•
Serial Number (if applicable)
•
Status
•
Balance of the account
Foreign Currency Deposit Accounts
From the Dashboard, select Deposit Accounts or Time Deposits.
Deposit Accounts
1. Select by currency (when there is more than one account for that currency) or by a specific
account, to view details such as balance and transactions. Each account will include the
following information:
• Account name
• Last 4 digits of the Account Number
2. View balance information
3. Search by Account Name or Account Number
4. Filter by:
• Current Balance
• Ledger
• Available
• Search by Amount
• Sort by:
• Account Name
• Account Number
• Current Balance
5. View Transactions
6. Search Account Transactions
7. Filter by:
• Debi
t
• C
redit

September 2023 Business Suite Mobile App
11
• Date
:
• Last 30 days (default)
• Today
• Prior Day
• Last 7 Days
• Set a Custom Range
• Amount
8. Sort by:
• Date
• Description
• Amount
9. View Transaction Details for additional information such as Date, Description, and Status.
Time Deposit Accounts
• All your deposit accounts will be displayed.
• Select by currency (when there is more than one account for that currency) or by a specifi
c
ac
count, to view details such as balance and transactions.
• Each account will include the following information:
• Account name
• Last 4 digits of the Account Number
• Balanc
e
• Maturity Date
• As of Date/Time
Inv
estment Sweep Accounts
1.
From the Dashboard, select Investment Sweep Accounts.
2.
All accounts will display with the following information:
• Account name
• Last 4 digits of the Account Number
• Rate
• Available Balance
• Fund Name
• Current Investment Balance
• Pending Transactions
• Current 7-Day Yield
• Current 30-Day Yield
• As of Date/Time

September 2023 Business Suite Mobile App
12
Loan Accounts
1.
From the Dashboard, select
Loan Accounts
.
2.
All accounts will display with the following information:
•
Account name
•
Last 4 digits of the Account Number
•
Principal Balance
•
Interest Rate
•
Next Due Date
•
Maturity Date
3
.
Search by Account Name or Account Number.
• Filter by:
• Amount
• Interest Rates
• Next Due Date
• Maturity Dates
• Sort by:
• Account Name
• Account Number
• Principal Balance
• Interest Rate
• Next Due Date
• Maturity Date

September 2023 Business Suite Mobile App
13
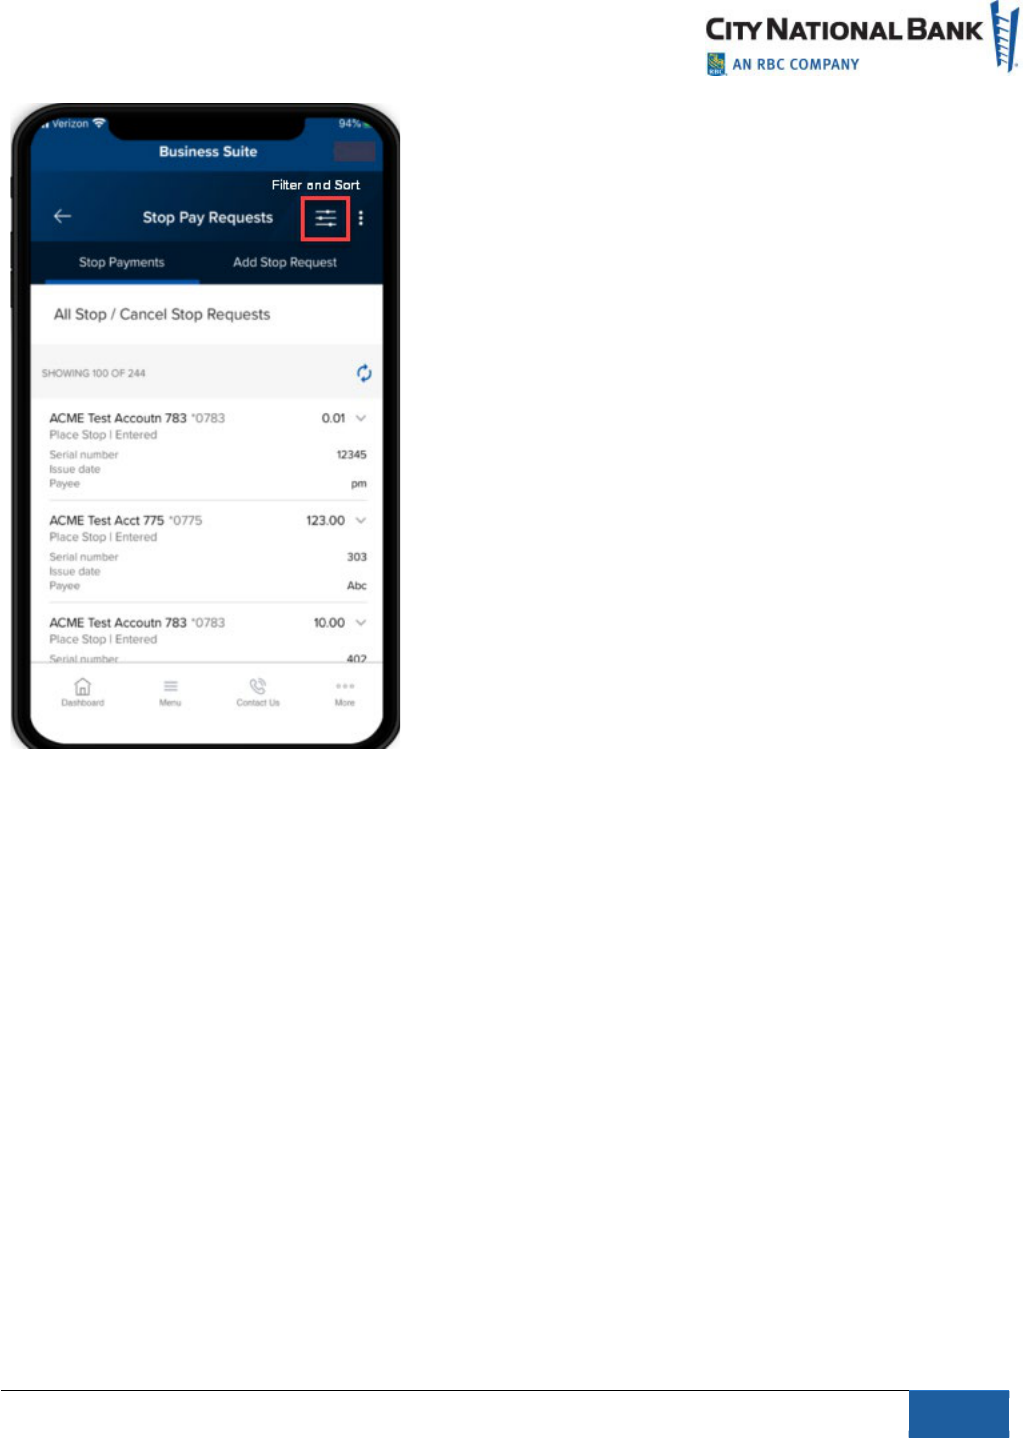
Stop Pay Requests
Approve a Stop Pay Request for a single check and for a range of checks. You may also cancel a
stop on a single check.
1.
Select
Accounts
from the Menu.
2.
Select
Stop Pay Requests.
A list of items will display.
3.
Select a check (or *multiple items) to
Approve for Stop Payment
or
Cancel Stop
P
ayment**
on a single check.
4.
A confirmation will display to show the status of your request.
Filter by:
•
Status
•
Request Type
•
Serial #
•
Range End
•
Amount
•
Payee
•
Account Name
•
Account Number
So
rt by (ascending or descending order):
•
Status
•
Request Type
•
Serial #
•
Range End
•
Amount
•
Payee
•
Account Name
•
Account Number
*To Approve a Stop Request for multiple single checks, select the three dots next to the filter
and sort icon. This will allow you to mark the items for Place Stop approval.
September 2023 Business Suite Mobile App
14
Transfers
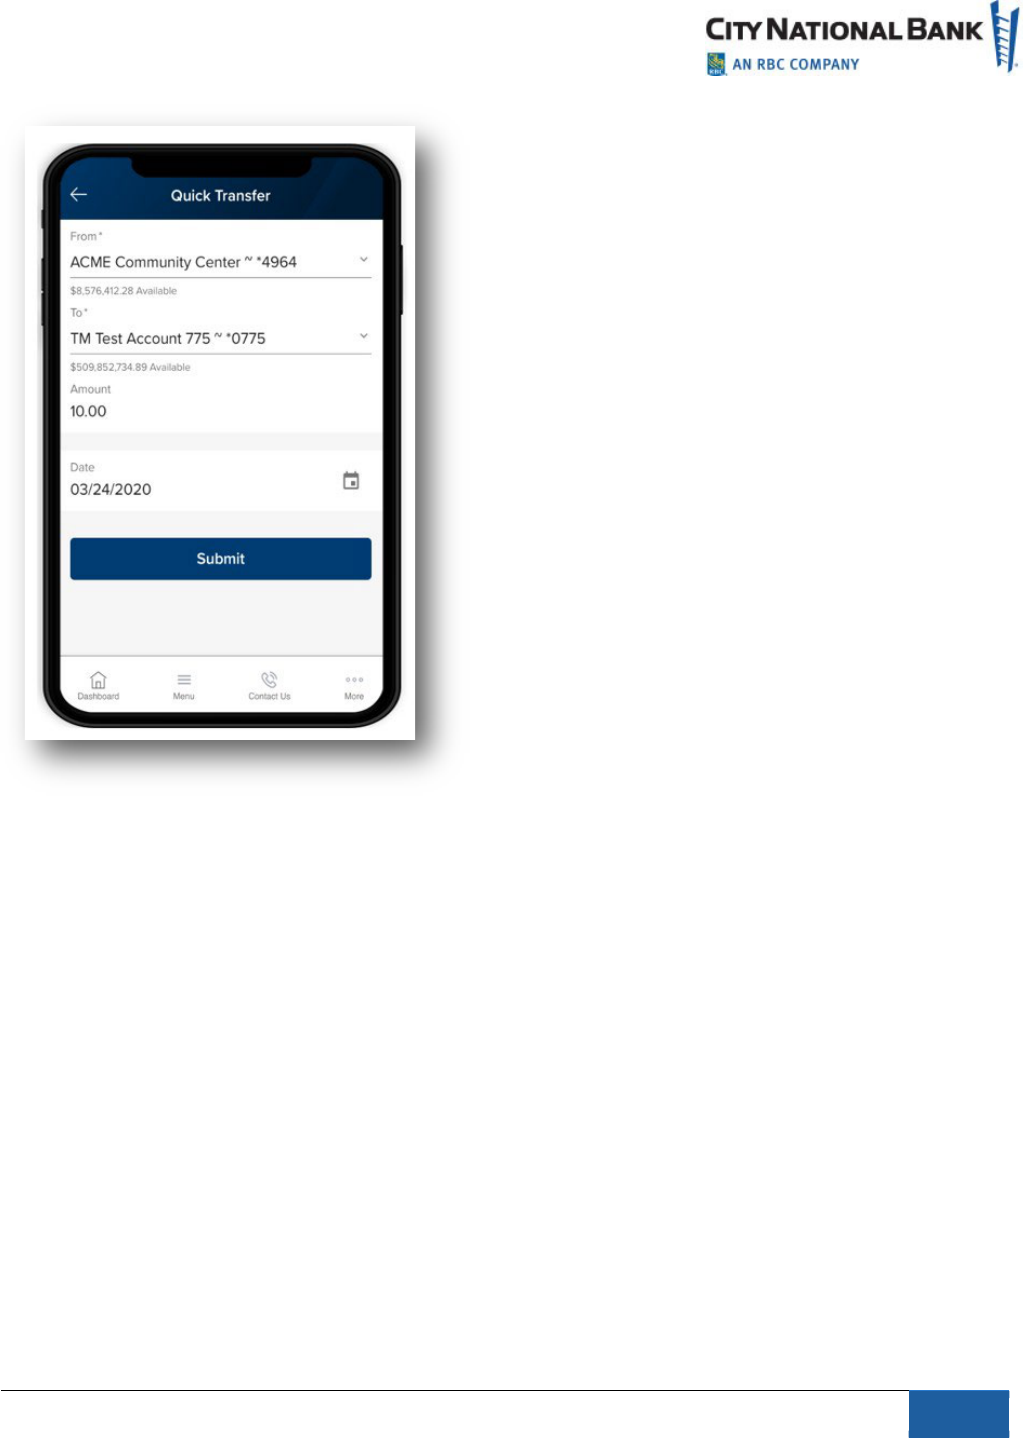
Quick Transfers
The Quick Transfer feature allows you to transfer funds between your City National Bank
accounts. Only accounts within the same Business Suite relationship are available for transfers.
If your company requires approvals for transfers, you can also approve transfers if entitled to do
so.
1.
Select
Quick Transfer
from the Menu. You can also access Quick Transfer from your
Dashboard if you have this widget displayed with your dashboard widgets.
2.
Select the
From
Account.
3.
Select the
To
Account
.
4.
Enter the
Amount
and
Date
and click
Continue.
5.
Review
and verify transfer details, then select
Submit
as shown below.
September 2023 Business Suite Mobile App
15
6.
A transfer submitted without errors will display “
Payment Submitted”
on the
confirmation page.
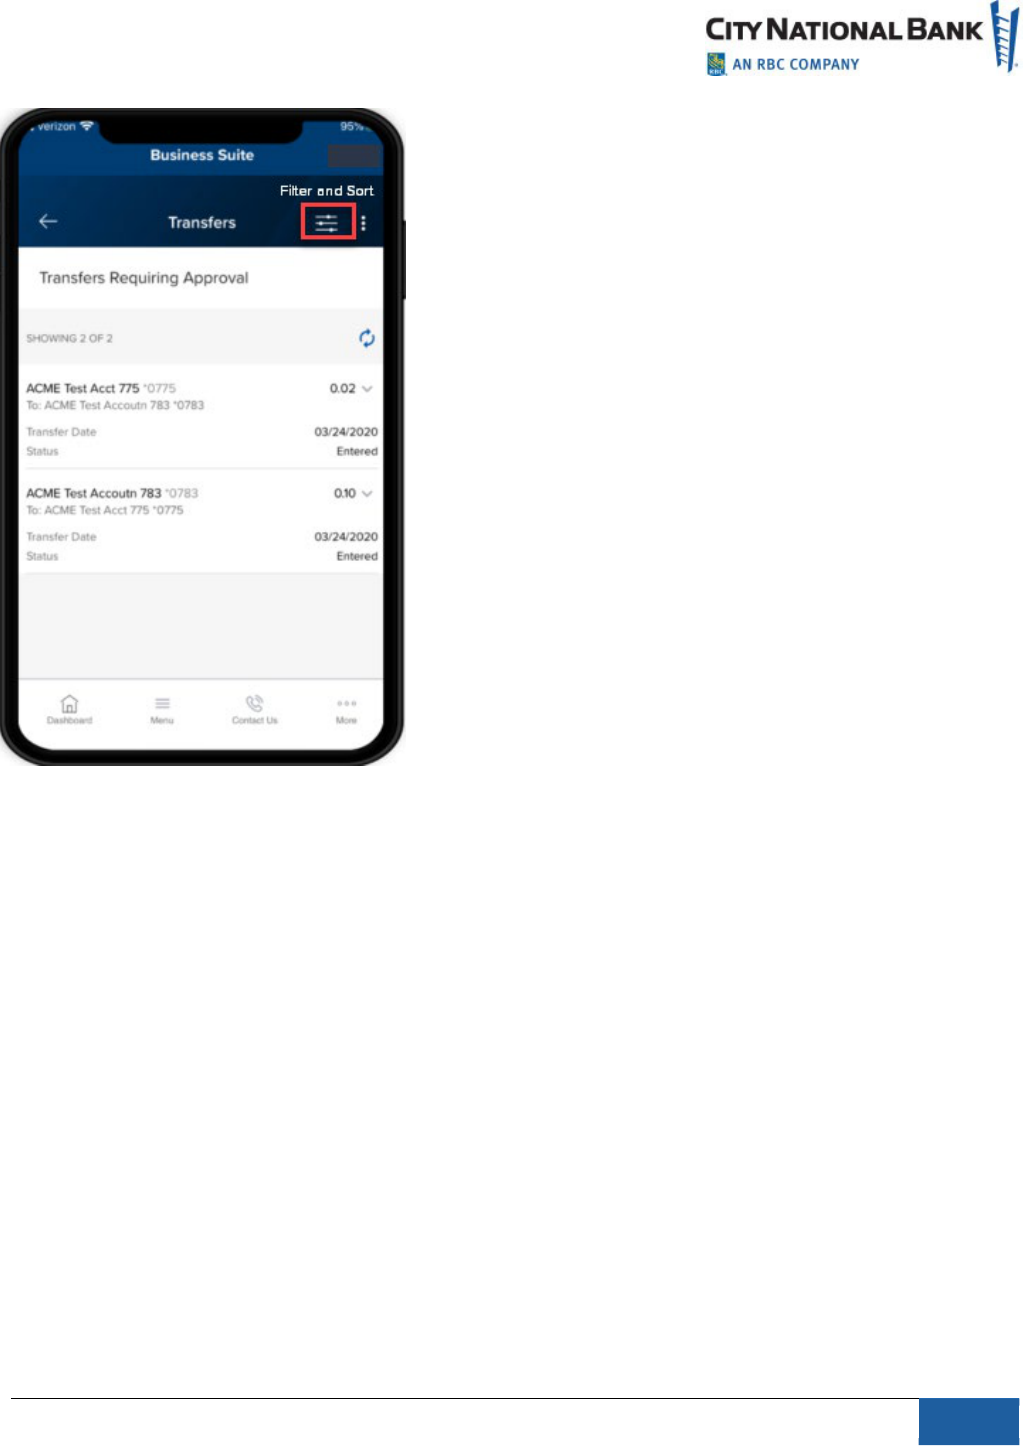
Approve Transfers
If your company requires approval of transfers, this feature allows the approvers to do so.
1.
Select
Transfers
from the Menu.
2.
Select Transfers Requiring Approval.
3.
Review the transfer details.
4.
Select
Approve
.
Note:
In order to Unapprove a transfer, please log into the full site on your computer.
Filter by:
•
From Account Name
•
From Account Number
•
Status
•
To Account Name
•
To Account Number
•
Transfer Date

September 2023 Business Suite Mobile App
16
Sort by: (ascending or descending order)
•
Amount
•
From Account Name
•
From Account Number
•
Status
•
To Account Name
•
To Account Number
•
Transfer Date
SINGLE APPROVAL
: Select the item to approve. It will open up to a page to a Transfer Details
page and an option to
Approve
.
MULTIPLE APPROVALS
: Select the three dots next to the filter and sort icon and select
Approve as shown below. You will be able to see the Transfer requests pending approval.
Select the items and select
Approve
.
September 2023 Business Suite Mobile App
17
Payments
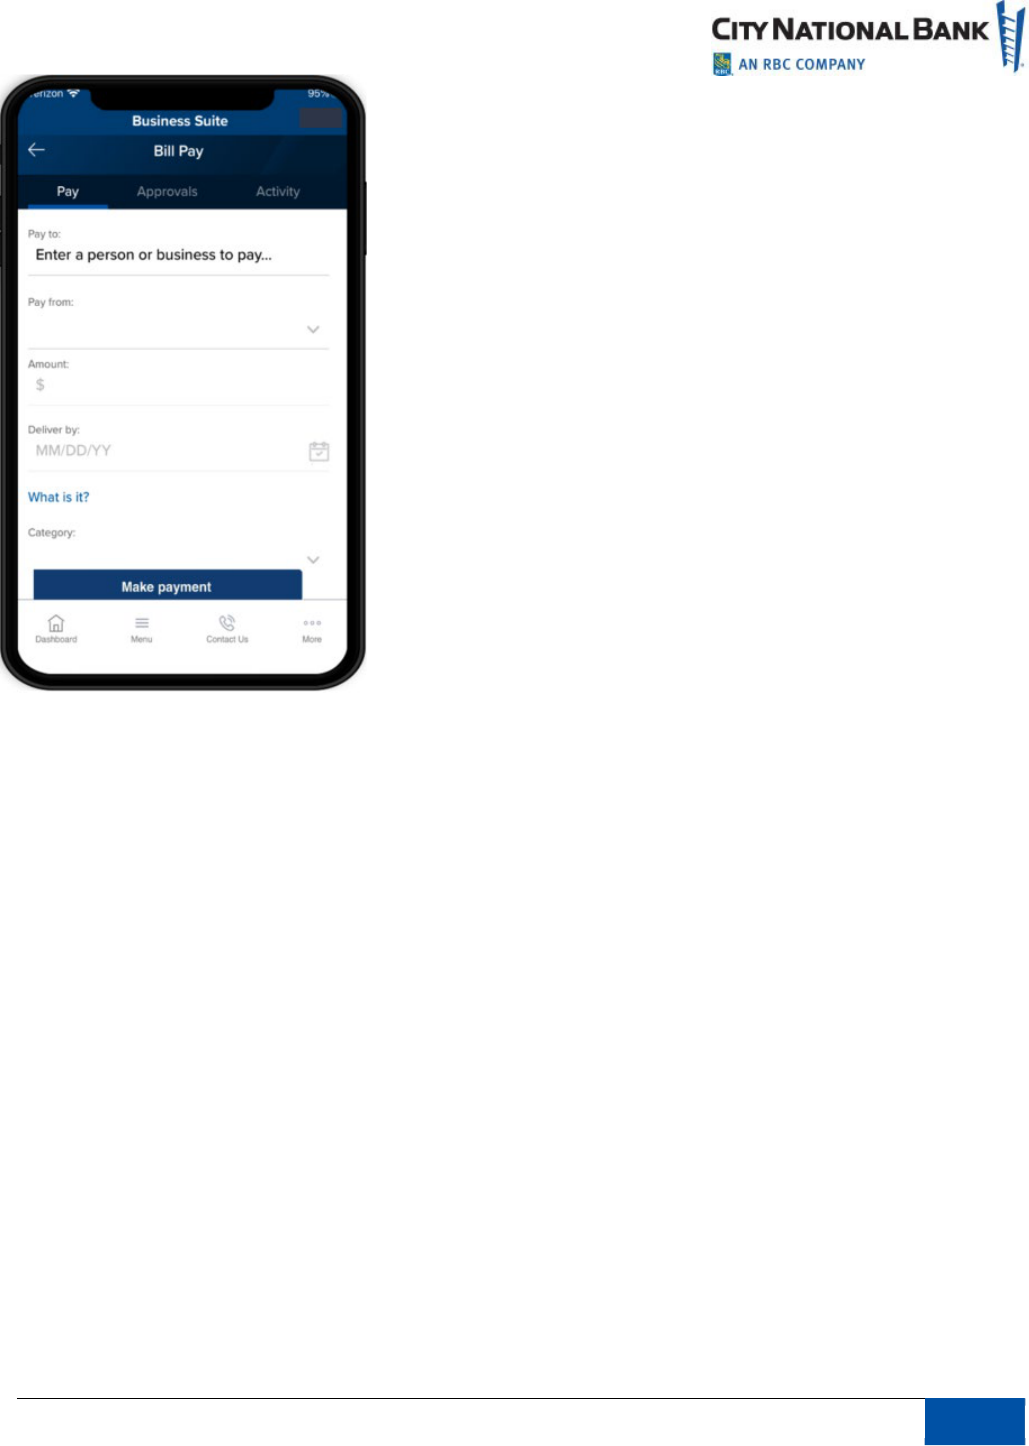
Bill Pay – Single Payment
The Bill Pay feature will allow you to make individual payments to existing payees, review
scheduled payments, approve payments, and view payment history.
1.
Select
Payments
from the Menu.
2.
Select
Bill Pay
.
3.
Pay to
: Type a payee name from an existing list of payees
.
4.
Pay From
: Select Funding Account.
5.
Category
: Select from drop down menu.
6.
Enter Amount.
7.
Enter Delivery by date.
8.
Select
Make Payment
.
9.
Preview and then click
Confirm.
Note:
In order to add new payees, make multiple payments, or edit scheduled payment, please
log into the full site on your computer.
September 2023 Business Suite Mobile App
17
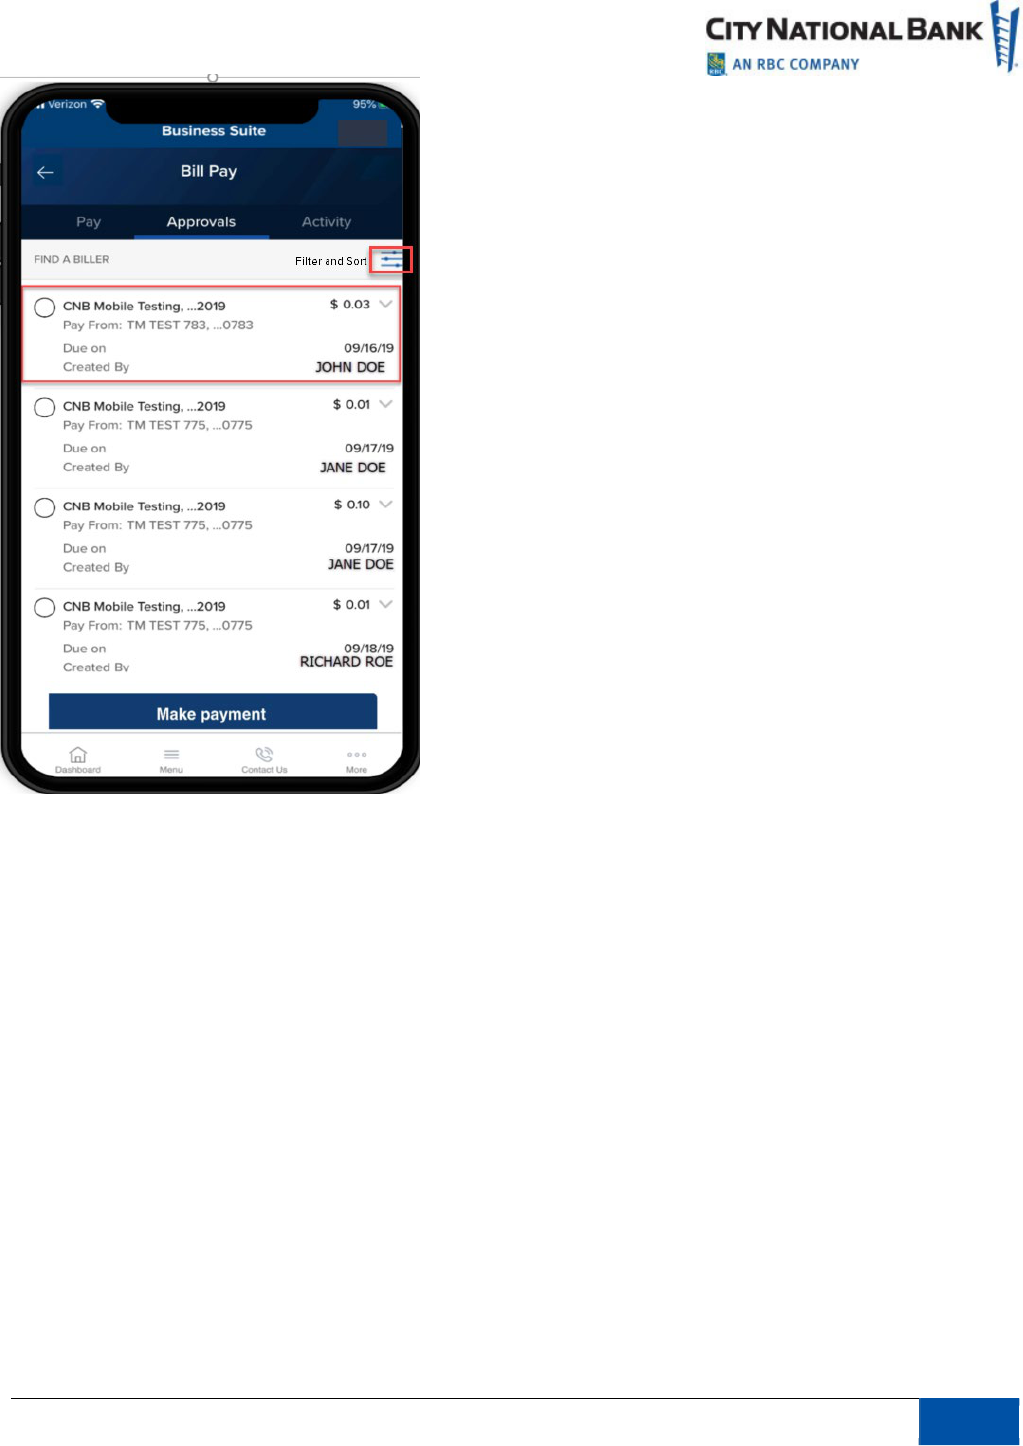
Bill Pay – Approve Payments
Individuals who are authorized to approve payments will be able to approve a single or several
single payments by going to the Approvals page on Bill Pay.
1.
Select the payment item(s) you want to approve.
2.
Select
Submit.
(If needed, you will have the option to cancel the payment prior to the
payment date).
18
September 2023 Business Suite Mobile App
17
Bill Pay – Activity (Scheduled Payments) and History
Activity
(Scheduled Payments) - Scheduled payments will allow you to review and cancel
scheduled payments.
1.
Select
Payments
from the Menu.
2.
Select
Bill Pay
.
3.
Go to Activity.
Activity provides you with a list of scheduled payments and the following information:
•
Deliver By
•
Paid To
•
Amount
•
Total Scheduled
4.
Select a scheduled payment to review the details. This will also be where you will find the
option to cancel the payment.
19

September 2023 Business Suite Mobile App
17
Canceling a Payment
1.
To cancel a scheduled payment, select the
Cancel
button.
2.
Review cancel payment details and select your choice of
Cancel Payment
or
Don’t
Cancel Payment
.
3.
If Cancel Payment is selected, a message will appear that states “Your payment to
for $ amount was canceled on MM/DD/YY”.
History
With the history function, you can view a list of paid items.
1.
Select
Payments
from the Menu.
2.
Select
Bill Pay
.
History lists all past payments with the following information:
•
Deliver By
•
Paid To
•
Amount and Status
•
Total Paid
3.
Select a paid item to view additional details.
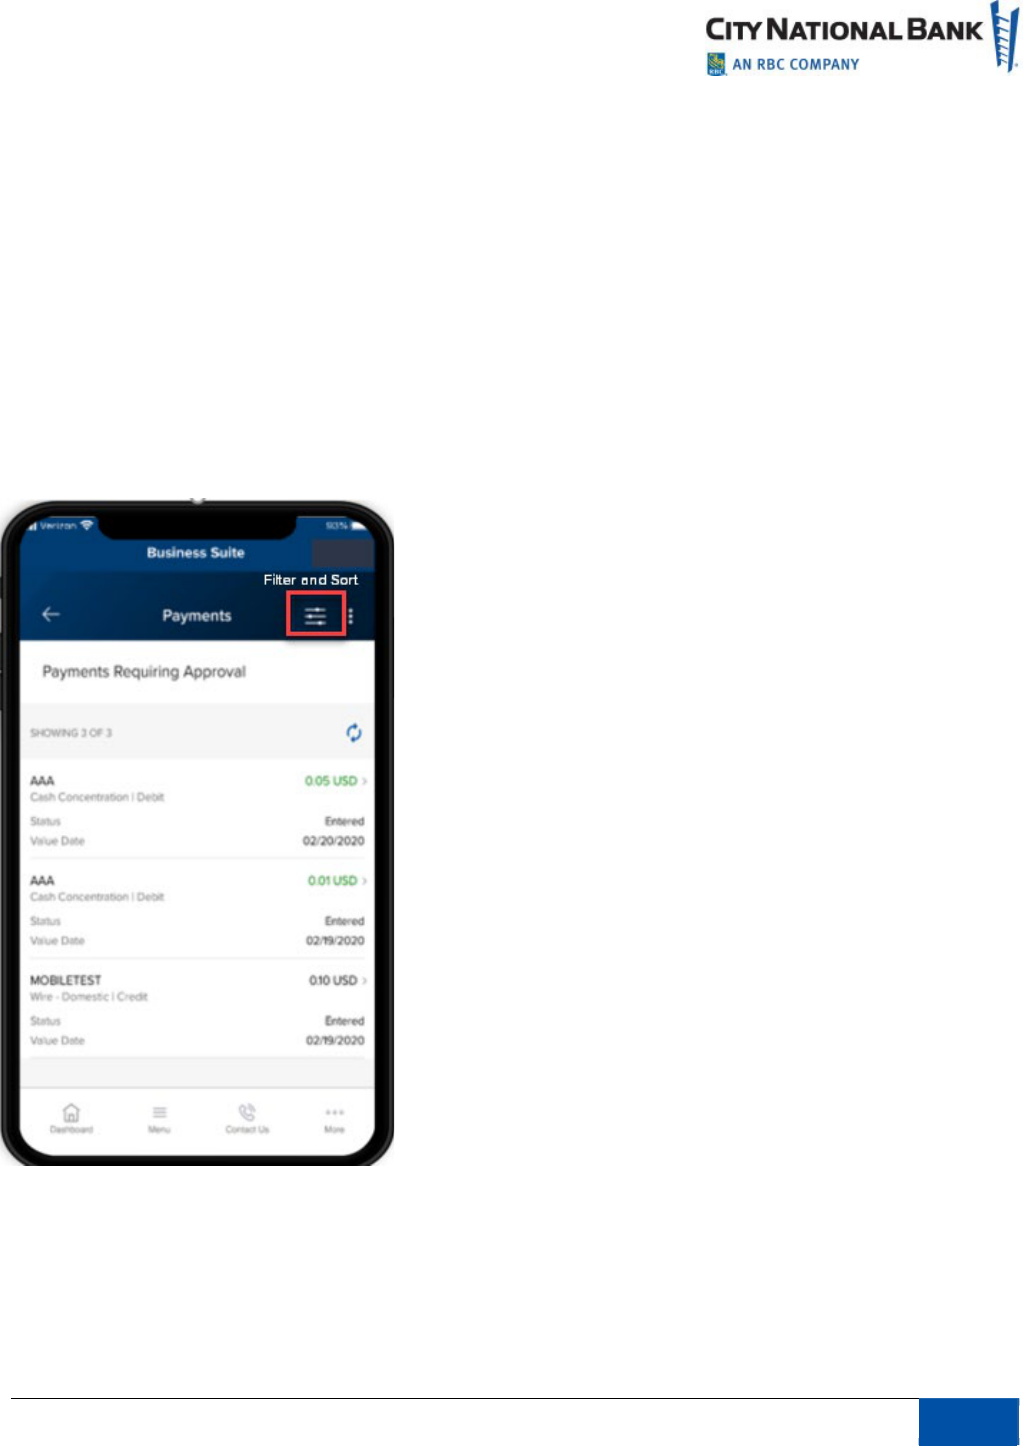
Payments Requiring Approval
Depending upon your permissions and roles at your firm, you may approve payment
requests that have been previously entered in the desktop application.
1.
Select
Payments
from the Menu (or, via the Payments widget on your Dashboard to go
directly to the Payments module).
2.
Select
Payments
to arrive at
Payments Requiring Approval
where you will see a list of
payments awaiting approval.
3.
Select the payment for approval. For multiple approvals, use the three dots next to the
Filter and Sort icon. This will allow you to mark the items for payment approval.
Filter by:
•
Amount
•
Beneficiary
•
CCY
•
Confirmation Number
•
Credit/Debit
•
Debit Account Name
•
Debit Account Number
•
Payment Type
•
Status
•
Value Date
20
September 2023 Business Suite Mobile App
17
Sort by (in ascending or descending order):
•
Amount
•
Beneficiary
•
CCY
•
Confirmation Number
•
Credit/Debit
•
Debit Account Name
•
Debit Account Number
•
Payment Type
•
Status
•
Value Date
21

September 2023 Business Suite Mobile App
17
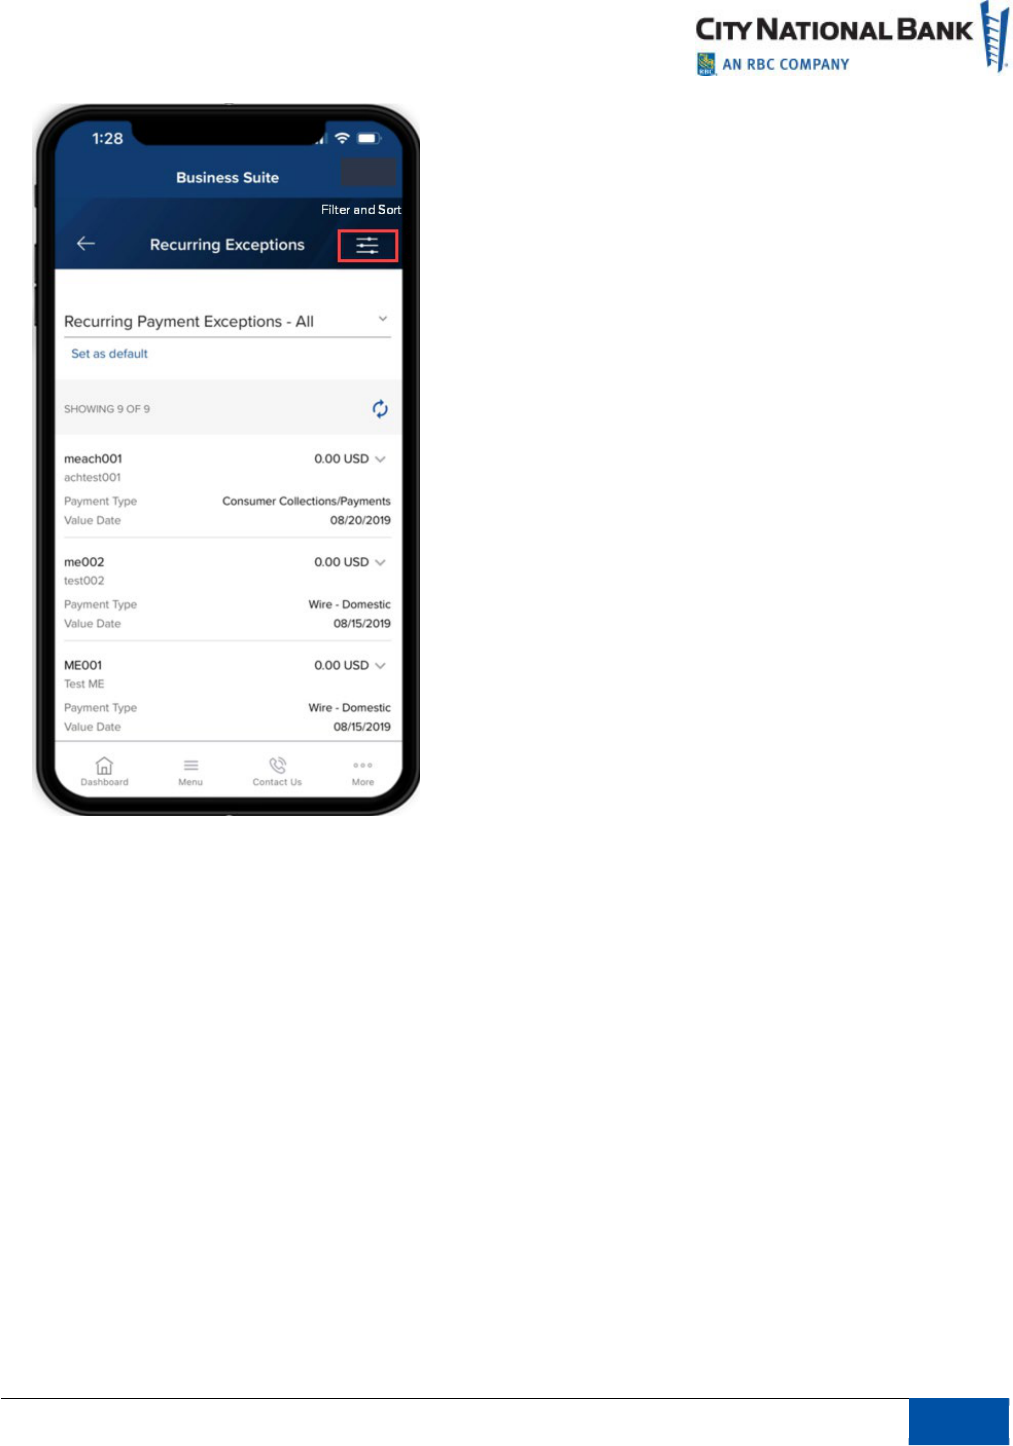
Recurring Exceptions (Payments)
This function provides notifications for scheduled payments exceptions.
1.
Select
Payments
from the Menu (or via the Notifications widget on your Dashboard,
select the
Recurring Payments that recently failed
link to go directly to the Payments
module).
2.
Select
Recurring Exceptions
to view the list of schedule payments exceptions.
3.
Customize your view by selecting the drop-down arrow next to Recurring Payment
Ex
ceptions and choose from the following options:
•
All
•
Last 30 days
•
Last 60 days
•
Last 7 days
Filter by:
•
Template ID
•
Description
•
Payment Type
•
Payment Account
•
CCY
•
Value Date
•
Occurred On
•
Reason
Sort by (ascending or descending order):
•
Template ID
•
Description
•
Payment Type
•
Payment Account
•
CCY
•
Value Date
•
Occurred On
•
Reason
22
September 2023 Business Suite Mobile App
17
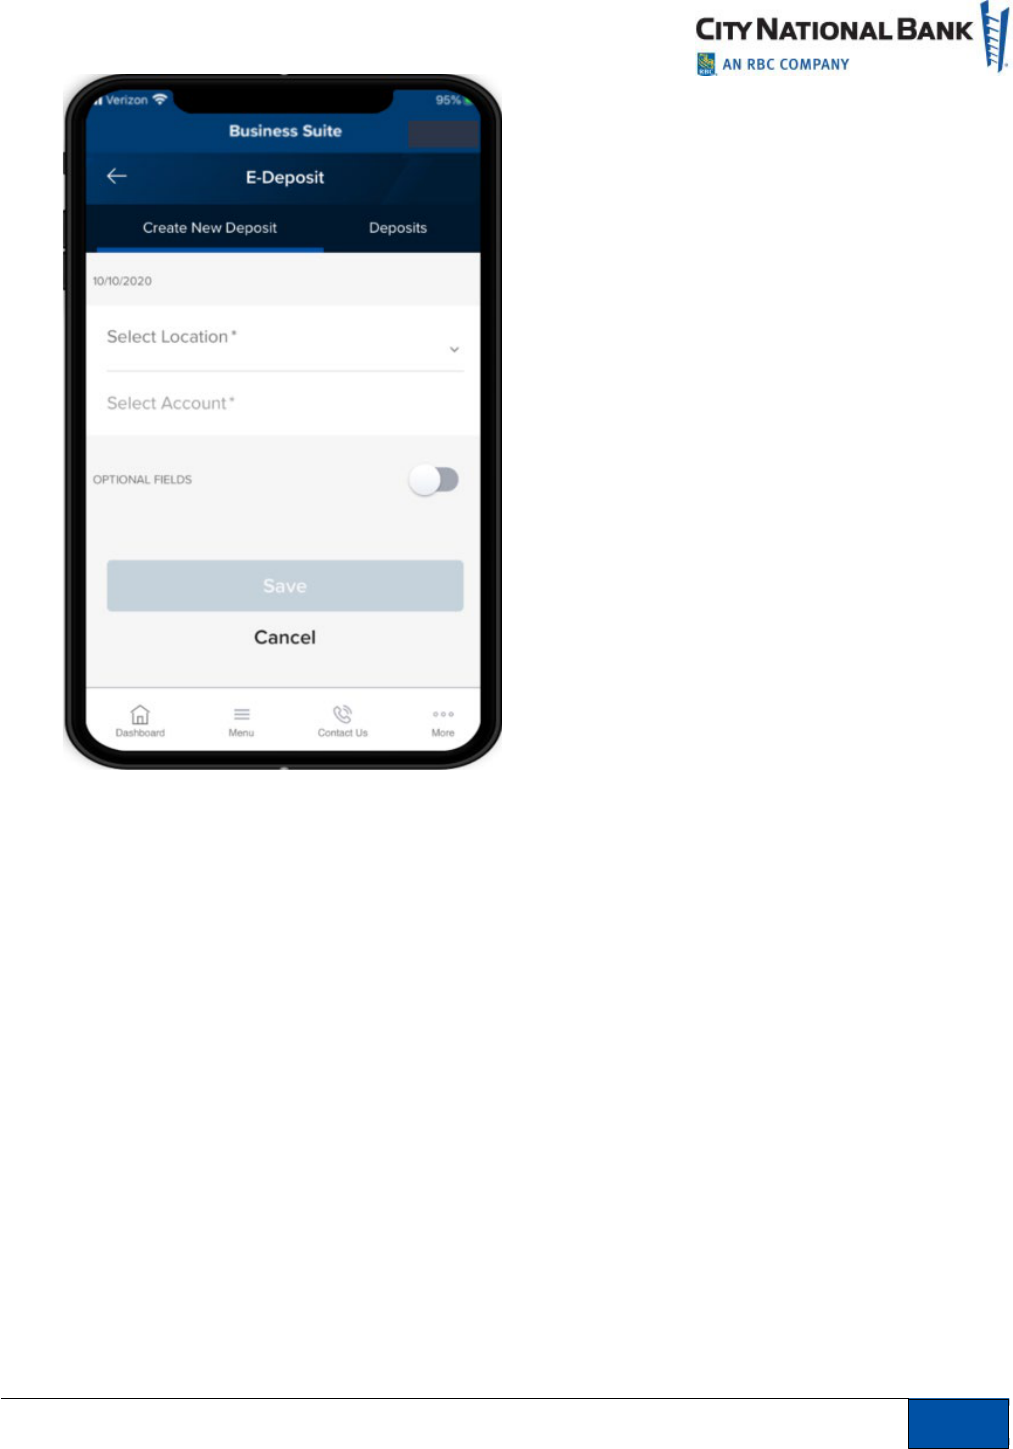
E-Deposit
E-Deposit enables users to create a deposit by using a mobile device to capture the images of a
check and transmitting it to City National Bank for credit.
Create Deposit
To start the deposit, follow these steps:
1.
Select
Receivables
from the Navigation Menu.
2.
Select
E-Deposit
.
3.
Create New Deposit page displays.
4.
Create a new deposit by first selecting a location.
5.
Select an account number where the check will be deposited.
6.
Save the information by selecting
Next
.
23
September 2023 Business Suite Mobile App
17
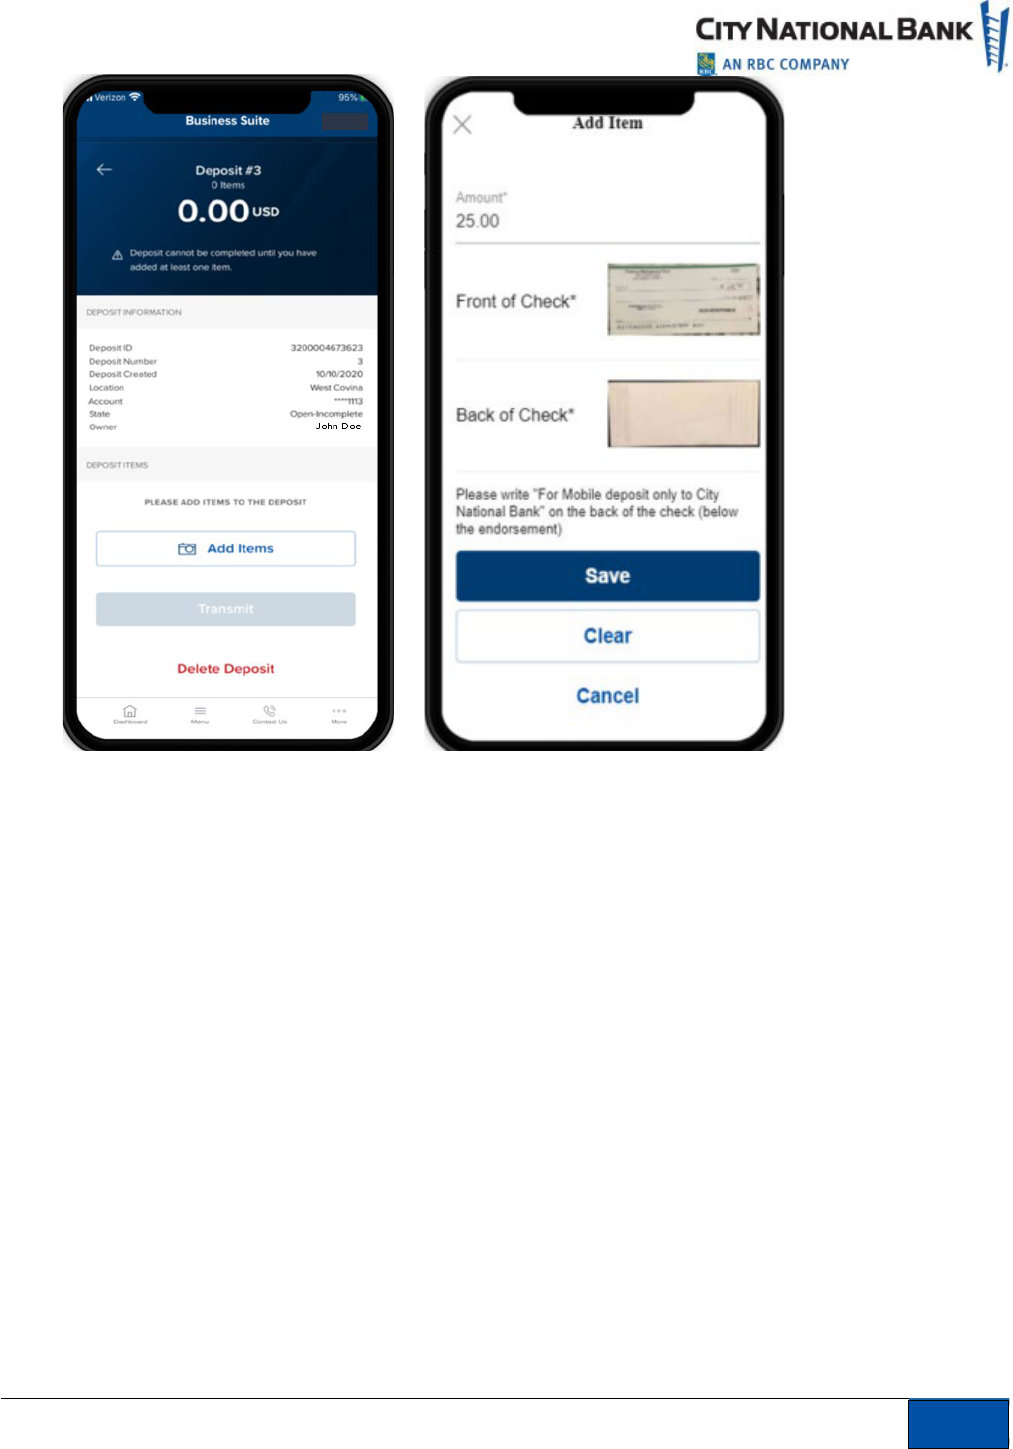
Add Items
1.
Add an item (check) to the deposit information you saved by selecting
Add Items
.
2.
Enter amount of check for deposit.
3.
Capture the image of the front of the check by selecting the camera icon in the field
labeled.
4.
Take a picture of the front of the check ensuring
that all four corners of the check are
captured
. If you would like to change the picture, simply tap the picture you just took--
this will allow you to retake an image and replace the previous picture.
5.
Capture image of the back of the check by selecting the camera icon in the field labeled:
Back of the check
. Follow the same procedures above for taking a picture of the check.
24
September 2023 Business Suite Mobile App
17
6.
Review your entry and select
Save
.
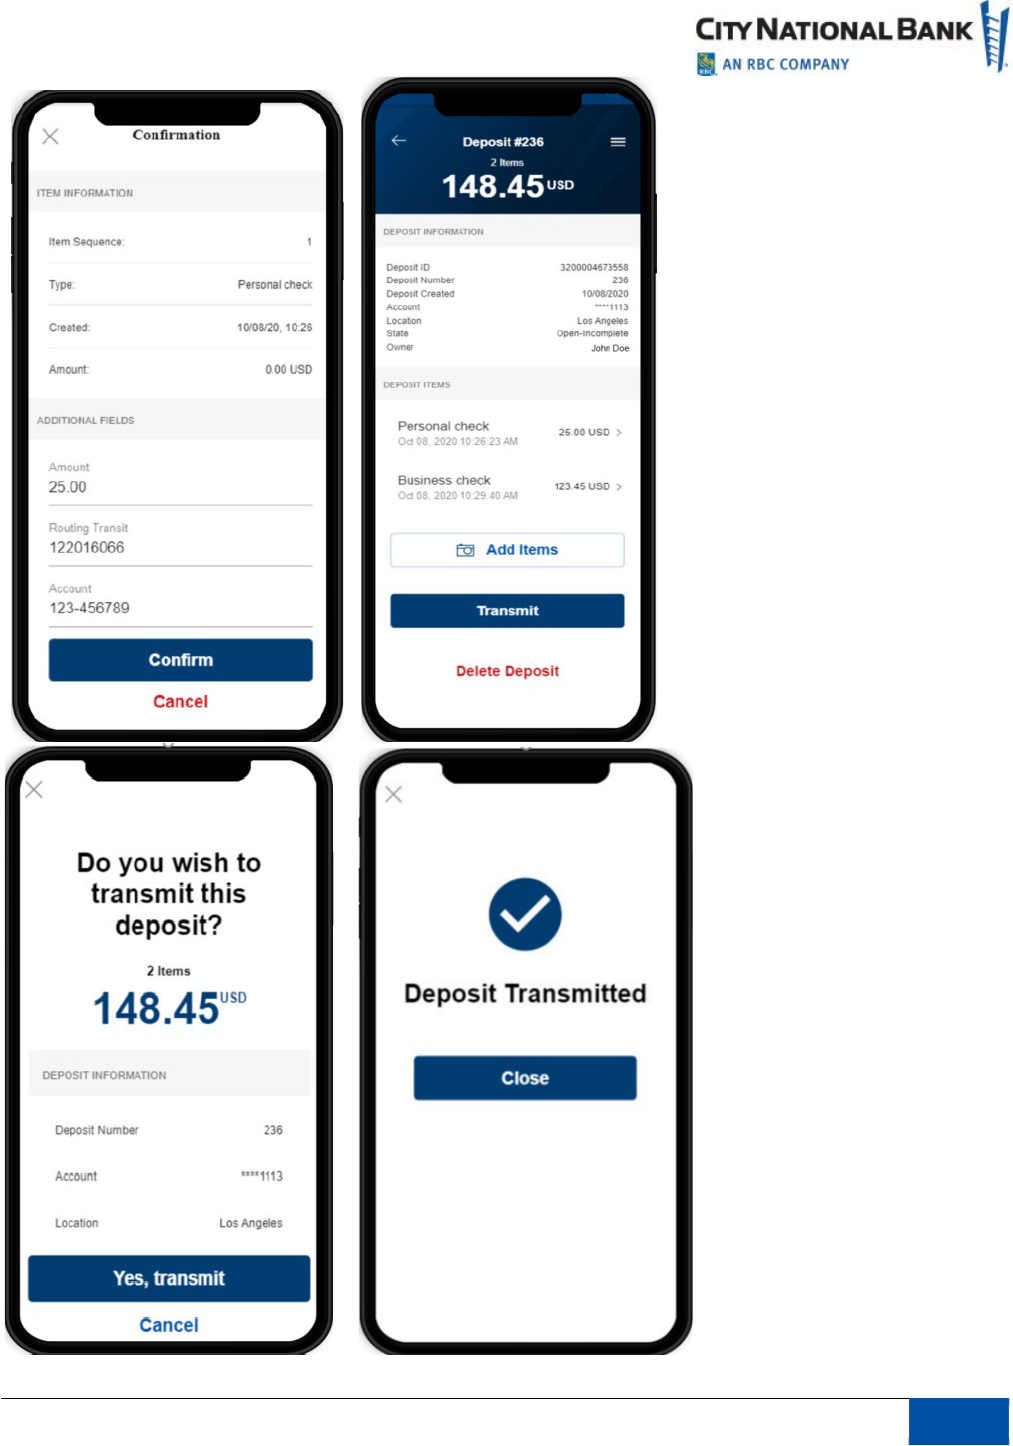
Con
firmation and Transmission
1.
After adding an item, the Confirmation page will display.
2.
Make any necessary corrections to
Amount
,
Routing Transit number
or
Account
number
.
3.
Confirm the deposit information.
4.
The Deposit information page will display which will show a list of the deposit items to be
transmitted.
5.
You can add checks to the Deposit by selecting
Add Items
.
6.
When finished adding items, select
Transmit
to send the deposit items to the bank.
7.
A Deposit Transmitted page will appear to indicate that the transmission was successful.
25
September 2023 Business Suite Mobile App
17
26

September 2023 Business Suite Mobile App
17
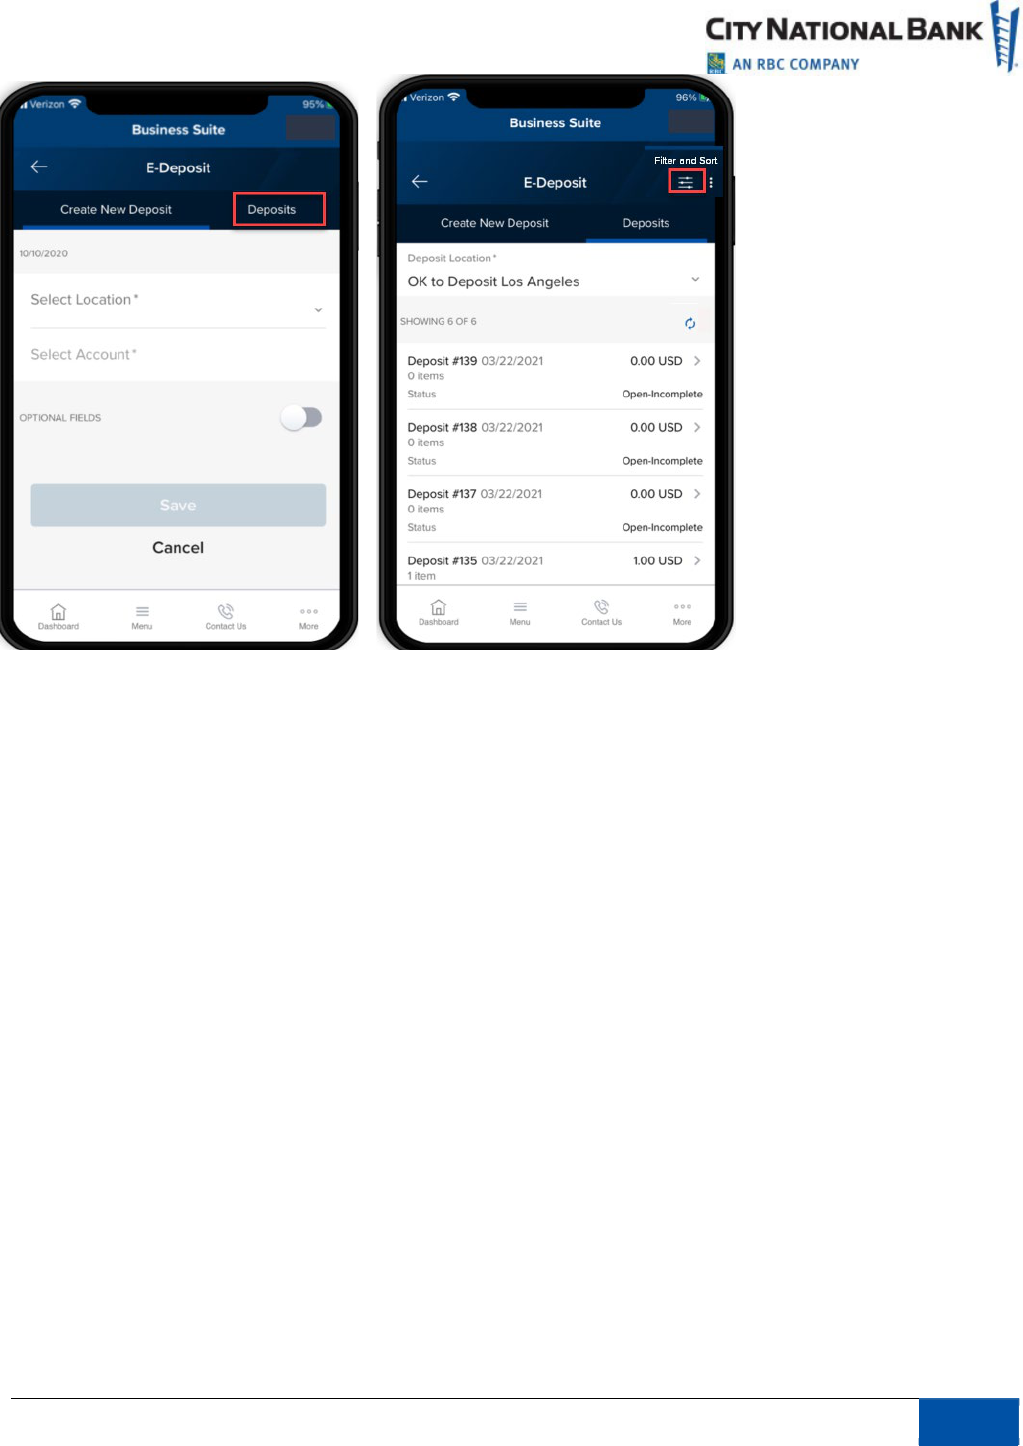
Deposits
The Deposit tab displays a list of deposits that have been created and their status. A status of
Received indicates the deposit has been successfully transmitted to City National Bank and the
status of Open-Incomplete shows it is waiting for further action including adding or removing
items or transmitting the deposit.
To view the list of Deposits, follow these steps:
1.
Select
Receivables
from the Navigation Menu.
2.
Select
E-Deposit
.
3.
Select Deposits tab.
4.
Select
Location
.
5.
Select
Account
.
6.
A list of deposit items will display with their status.
•
Received indicates a successful transmission to the bank.
•
Open-Incomplete indicates that the deposit item is pending further action.
Filter by:
•
All Open
•
Today (this is the default setting)
•
Last 7 days
•
Last 14 days
•
Last 30 days
•
Last 60 days
27
September 2023 Business Suite Mobile App
17
Fraud Control
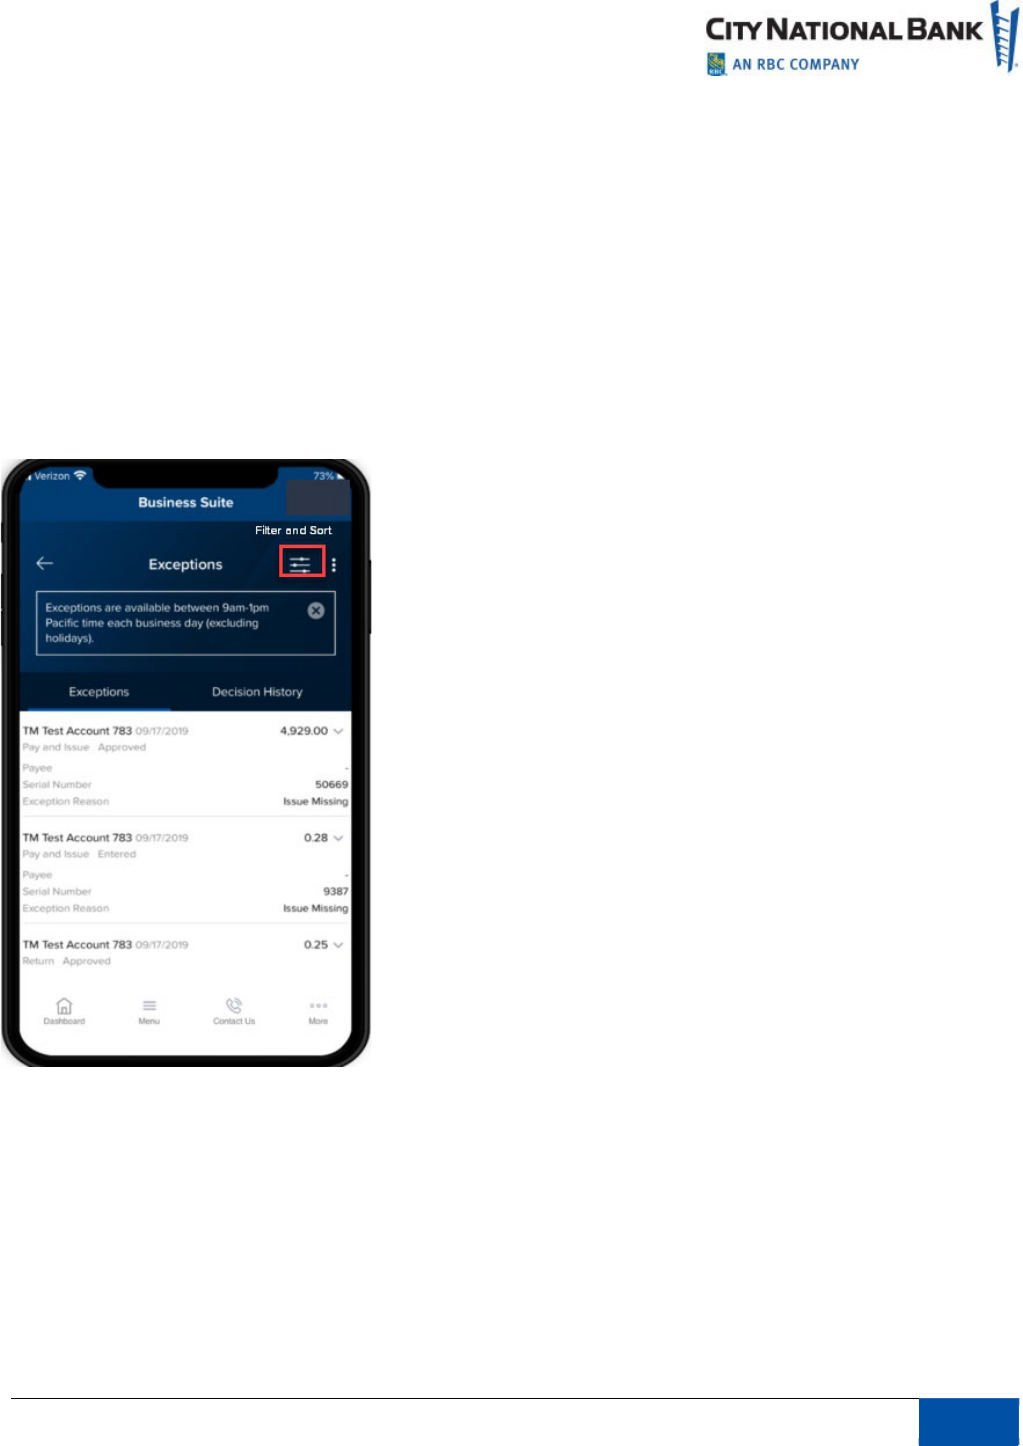
Exceptions
Pay, pay and issue, or return an exception item.
1.
Select
Fraud Control
from the Menu (or via the Exceptions widget on your Dashboard,
select
Exceptions Management
).
2.
A list of Exception items will display.
3.
Select the items for which you would like to make a decision.
Filter by:
•
Account Name
•
Account Number
•
Status
•
Serial Number
•
Paid Amount
•
Payee
•
Decision
•
Exception Reason
28
September 2023 Business Suite Mobile App
17
Sort by: (ascending or descending order)
•
Account Name
•
Account Number
•
Status
•
Serial Number
•
Paid Amount
•
Payee
•
Decision
•
Exception Reason
If required by your company, you also have the option to Approve/Unapprove the decisioned
item(s).
Decision History
The Decision History page provides a record of items that have been decisioned in the past.
1.
Select
Fraud Control
from the Menu (or via the Exceptions widget on your Dashboard,
select
Exceptions Management
).
2.
Select the
Decision History
tab.
3.
A record of previously decisioned items will display.
29

September 2023 Business Suite Mobile App
17
Filter by:
•
Account Name
•
Account Number
•
Approved By
•
Approved Date
•
Bank Reason
•
Decision Submitted
•
Issue Amount
•
Issue Date
•
Paid Amount
•
Paid Date
•
Payee
•
Return Reason
•
Serial Number
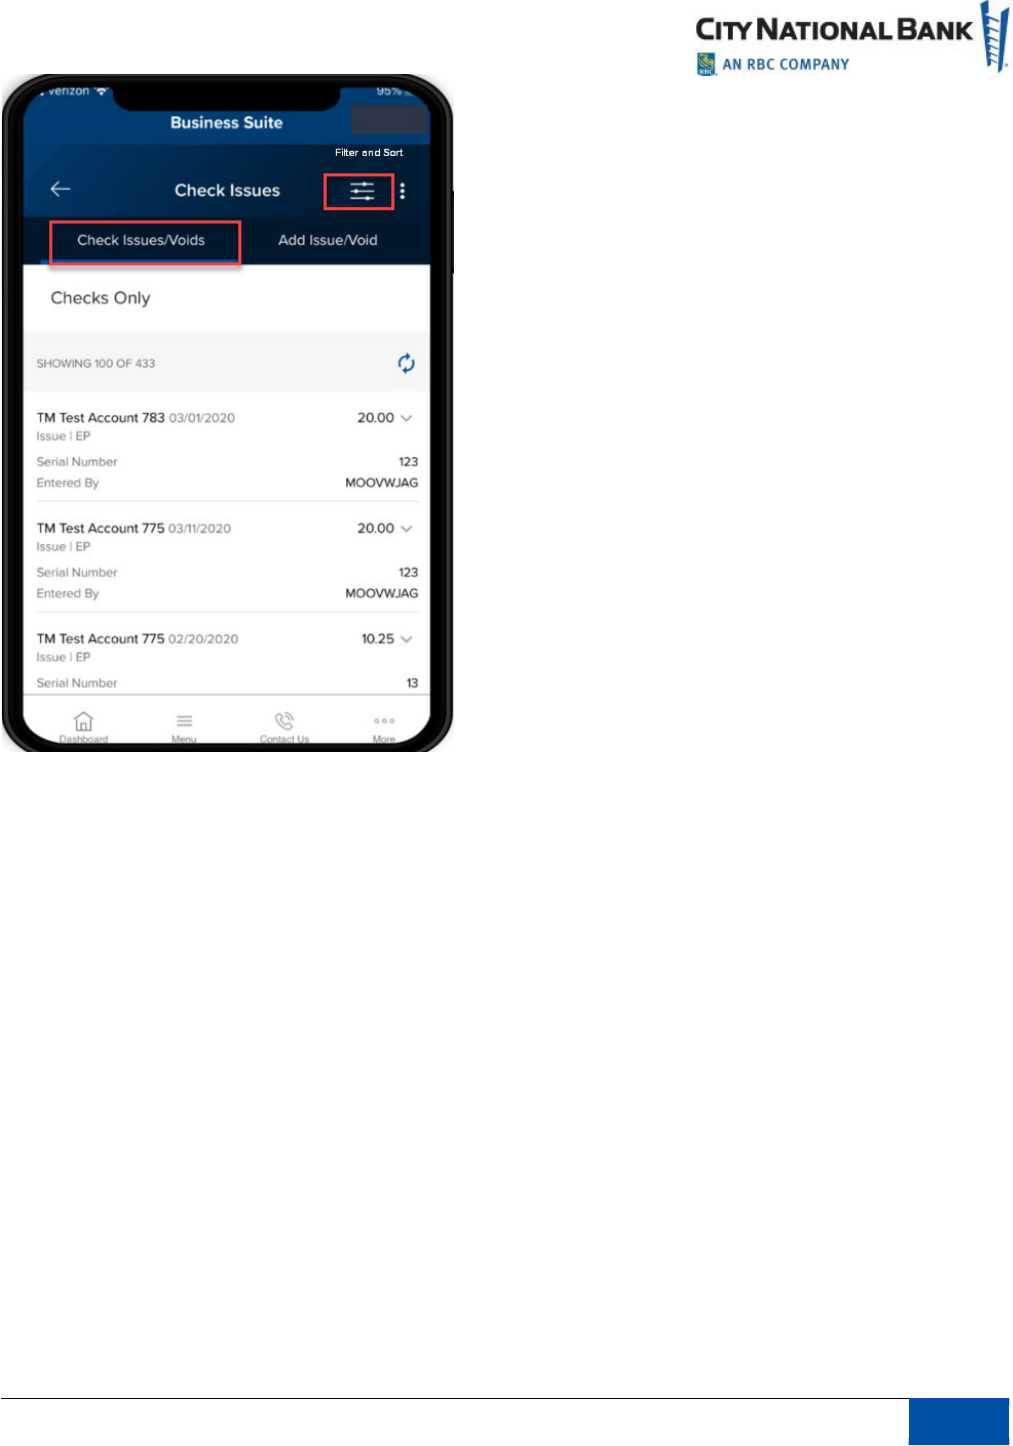
Check Issue/Voids
Approve or delete Checks Issue/Voids for Checks Only.
1.
Select
Fraud Control
from the Menu.
2.
Select Check Issues.
Filter by:
•
Account Name
•
Account Number
•
Status
•
Type
•
Serial Number
•
Date
•
Amount
30
September 2023 Business Suite Mobile App
17
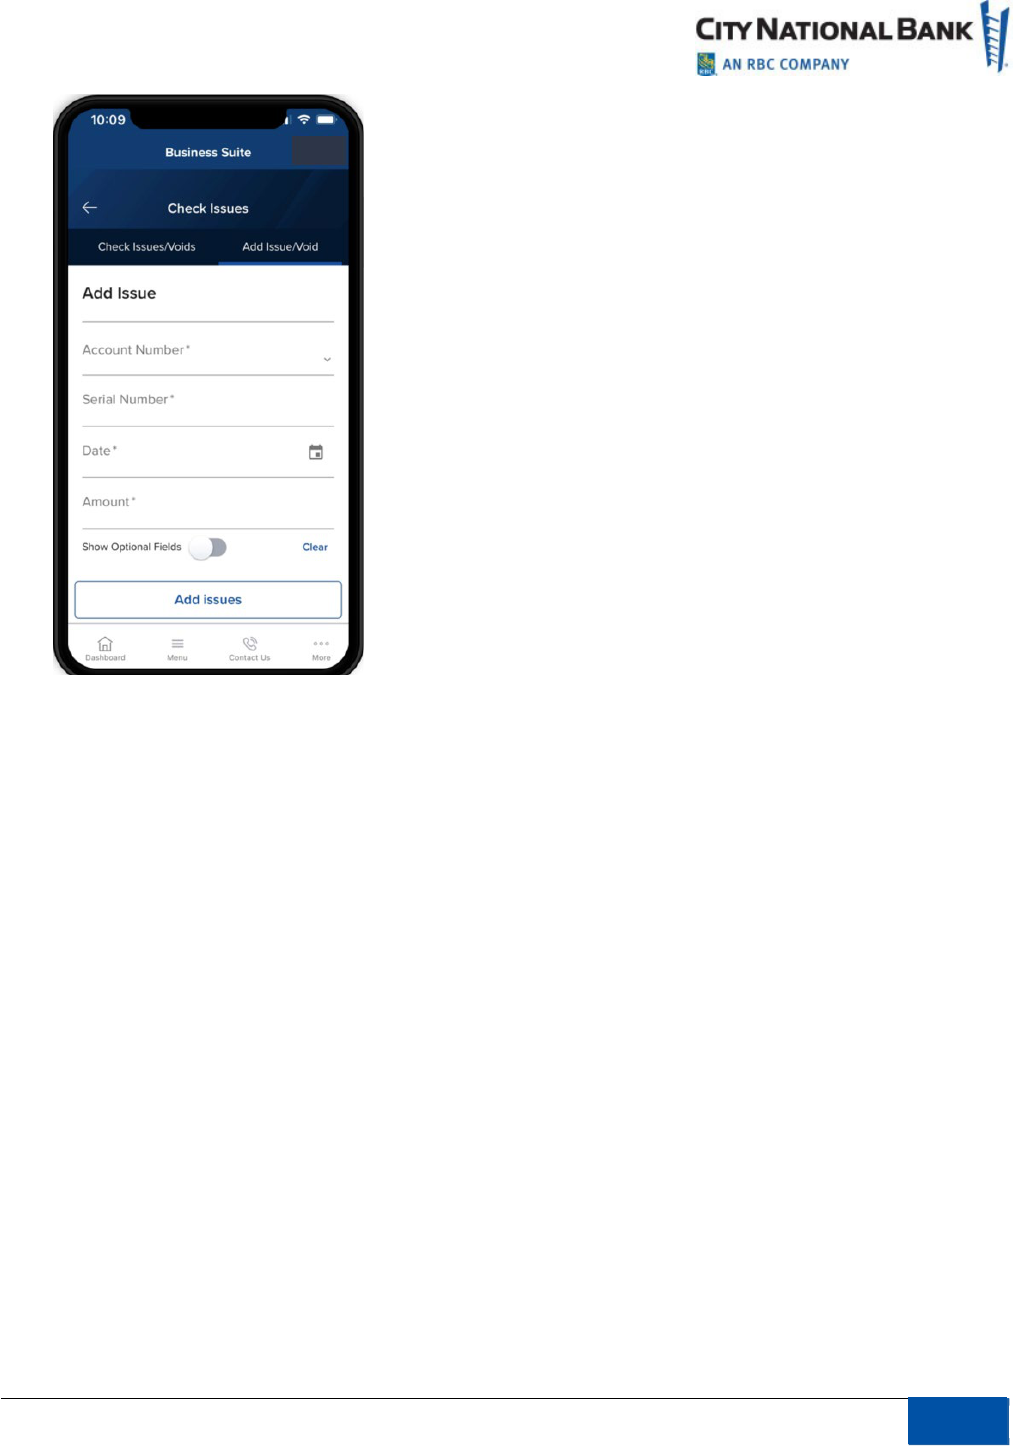
Add Check Issue/Voids as follows:
1.
Select
Fraud Control
from the Menu.
2.
Select
Check Issues
.
3.
Select
Enter Issues
.
4.
Enter
Issued Checks
, providing the following:
•
Account Name
•
Serial Number
•
Date
•
Amount
Opt
ional Fields (Payee and Memo) Add a new entry (limit to 5)
31
September 2023 Business Suite Mobile App
17
5.
Enter
Check Voids
, providing the following:
•
Account Name
•
Serial Number
•
Date
•
Amount
•
Optional Fields (Memo)
•
Add a new entry (limit to 5)
Administration
The Administration page displays a list of users. Users with Admin entitlements will be able
lock/unlock users or reset the password of another user.
Filter by:
•
Name
•
User ID
•
Address
•
Contact
•
Status
•
Service and Roles
32

September 2023 Business Suite Mobile App
17
Sort by: (ascending or descending order)
•
Account Name
•
Account Number
•
Status
•
Serial Number
•
Paid Amount
•
Payee
•
Decision
•
Exception Reason
33

September 2023 Business Suite Mobile App
17
About CNB
Learn more about City National Bank by selecting any of the following links on your mobile
phone:
•
About
•
Contact Us
•
Help
•
Locations
•
Terms & Conditions
•
Privacy & Security
•
Fraud Prevention Center
•
Secure Online Session
34
